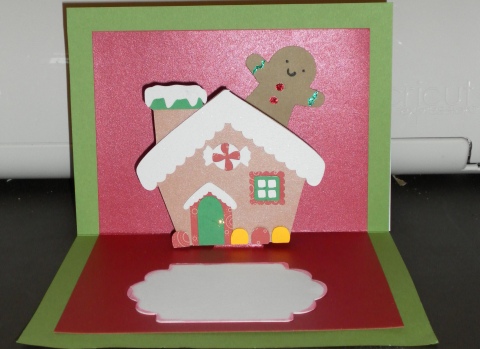
For this, I used a MTC and a My Scrap Chick set called North Pole, and it is so adorable! I did use Jolly Holidays for the gingerbread man, simply because it was a simple cut. I added a few stickles to him, pop dotted some elements of the house. and did the pop-up portion of the card. My nephew did everything else. he picked out all of the colors, the papers, the layout, the ribbon, and the saying! He wanted me to write inside, "Run, run as fast as you can, you can't catch me, I'm the gingerbread man." So that is exactly what I wrote, and you should have seen his face when it was all done. Well, actually, you can see it below! Lol. Of course, I wasin charge of the Cricut and the glue, but I was so impressed with what he came up with. Sunday we are doing a few more, so stay tuned. Thanks for visiting today!
A space to display my handmade cards and crafts!
Friday, December 3, 2010
My first ever pop-up card!
And boy, did I fall in love with this technique. It was so easy with the tutorial from Split Coast Stampers site, and this was created by my 7 year-old nephew Noah. Here's the story: a couple of weeks ago, he came to me and said, "Aunt Kim, I was wondering if maybe one day we could spend time together and you could help me make Christmas cards with your machine for everyone in the family." WELL, how cute is that?? He quickly ran off all of the themes he wanted, and my mind started going. Once he said gingerbread house for one, I knew it was time to try a pop-up card.
Thursday, December 2, 2010
Cookie box
This is an entry for our cybercrop over at MTC that I made. Dana over at SVG and MTC files graciously provided it to everyone for this challenge, and here is what I did with it. This is nice and big, and it was cut out on two pieces of 12x12 Bo Bunny paper. I used vellum for the cutout area, and the tag is a basic tag with Amy Chomas' gel pen holder and St. Nicholas font from Freefonts.com. The final product is 7: tall and 7" wide, and it was so simple to put together! Thanks, Dana!
Wednesday, December 1, 2010
Probably not deserving, BUT....
Two wonderful ladies have passed along an award to me, so I wanted to take a few minutes to acknowledge the honor! I do truly feel honored for this one, because I feel like I have been neglecting my blog lately. Long story short, I have been working a TON and crafting has been put on hold right now. I'm also spending most of my spare time trying to get all of my Mom's Christmas decorations up for and with her, since she is still walking with her cane and cannot do much. I even got on the roof last week - aren't you all proud??! I'm shocked I didn't break my legs!
Anyway, on to the subject at hand! Stacy at Love that Bug, and Maria at Stamp, Cut, Create both gave me this award, so I want to start off by thanking them! I have "known" Stacy for a while in blogger land and admired her great talent, but Maria is a new blogger friend, so I had an amazing time discovering her blog - she is AWESOME!! Given the rules of the award, I would love to give it back to her having just discovered her, but I guess that would be silly! So, what I can do is encourage all of you to head on over to Maria's and Stacy's blogs and check out all of the great projects they have been working on lately (check out Maria's test tube candy holders)!
OK, this is really long, so here are the rules for this award:
1. Thank and link back to the person who gave you the award - DONE!
2. Share 8 things about yourself
3. Pay it forward to 8 blogs you have just recently discovered
4. Contact those bloggers and tell them about the award
8 things about myself:
1. I work TOO MUCH!!! Lol
2. I have seven nieces and nephews, ranging in age from 23 to 7!
3. I got a Master's degree that I will never be able to use. Blah....
4. This was the sixth Thanksgiving without my Dad, and I still cried like a baby all day Wednesday. Ugh.
5. I discovered crafting and card making a year and a half ago after seeing the Cricut infomercial!
6. I am JUST starting to get into stamping, but will never have the time or patience to do the whole coloring in thing. God bless those of you talented people who do all of that!
7. I sometimes tend to be clumsy, and my boyfriend points and laughs. : )
8. I love animals, and cry and look away when I see those stupid commercials with Sarah McLaughlin singing, with pictures of abused animals flashing on the screen.
Now, the 8 blogs I would like to pass this along to (disclaimer: they may not all be recently discovered, sorry):
1. A Beanie Creation
2. Greenbean's Crafterole
3. TX Scrapper Mom
4. Creating With Scrapbooks
5. Cut By Connie
6. Card Creations By Lorraine
7. Staying Crafty
8. 4 Goofballs
Thank you again Stacy and Maria for passing this along, and I hope to get some actual crafting done this week!
Anyway, on to the subject at hand! Stacy at Love that Bug, and Maria at Stamp, Cut, Create both gave me this award, so I want to start off by thanking them! I have "known" Stacy for a while in blogger land and admired her great talent, but Maria is a new blogger friend, so I had an amazing time discovering her blog - she is AWESOME!! Given the rules of the award, I would love to give it back to her having just discovered her, but I guess that would be silly! So, what I can do is encourage all of you to head on over to Maria's and Stacy's blogs and check out all of the great projects they have been working on lately (check out Maria's test tube candy holders)!
OK, this is really long, so here are the rules for this award:
1. Thank and link back to the person who gave you the award - DONE!
2. Share 8 things about yourself
3. Pay it forward to 8 blogs you have just recently discovered
4. Contact those bloggers and tell them about the award
8 things about myself:
1. I work TOO MUCH!!! Lol
2. I have seven nieces and nephews, ranging in age from 23 to 7!
3. I got a Master's degree that I will never be able to use. Blah....
4. This was the sixth Thanksgiving without my Dad, and I still cried like a baby all day Wednesday. Ugh.
5. I discovered crafting and card making a year and a half ago after seeing the Cricut infomercial!
6. I am JUST starting to get into stamping, but will never have the time or patience to do the whole coloring in thing. God bless those of you talented people who do all of that!
7. I sometimes tend to be clumsy, and my boyfriend points and laughs. : )
8. I love animals, and cry and look away when I see those stupid commercials with Sarah McLaughlin singing, with pictures of abused animals flashing on the screen.
Now, the 8 blogs I would like to pass this along to (disclaimer: they may not all be recently discovered, sorry):
1. A Beanie Creation
2. Greenbean's Crafterole
3. TX Scrapper Mom
4. Creating With Scrapbooks
5. Cut By Connie
6. Card Creations By Lorraine
7. Staying Crafty
8. 4 Goofballs
Thank you again Stacy and Maria for passing this along, and I hope to get some actual crafting done this week!
Sunday, November 28, 2010
It's beginning to look a lot like Christmas....
...everywhere you go, including my blog! I hope no one minds that I once AGAIN changed the look of my blog - I tend to do that with the seasons/holidays. Let me know what you think.
Thanksgiving placecards
I know these aren't as fancy as some people's placecards I've seen posted, but this idea was from Carrie over at Greenbean's Crafterole, and I loved it when I saw it. I used the pumpkin cut from Create A Critter for some, and the turkey from Doodlecharms for some. I wanted to put some more details on them, such as the lines on the pumpkins and coloring in the plate on the turkey, but everyone came so early that I hadn't even finished the names yet, and they were all up in my face wondering what I had, LOL!! Oh well. The nieces and nephews all liked them - even my 23 year old niece loved it!
Eww, look how awful my handwriting is! Yuck. Anyway, I used thin chipboard that I got off of eBay a year or so ago, but you could use cereal boxes too, since that is what I normally use. I hope everyone had a wonderful holiday and weekend. Thanks for visiting!
Thursday, November 25, 2010
Happy Thanksgiving everyone!
I couldn't decide which I liked better, so I decided to post both! We got an extra special surprise this monring when it started snowing here in Philly! We have the parade down the Parkway every year, and it looked so beautiful with the snow falling!! Anyway, I hope everyone has a wonderful Thanksgiving Day, and takes time to be thankful for everything we have!
Just in case anyone didn't believe me, I just took this picture a few minutes ago! So pretty!
Tuesday, November 23, 2010
Finished MTC print and cut project!
Whew, I can't believe that it has been almost a week since I've posted! I have been putting in so many days and hours at work, I am EXHAUSTED! Literally - I have worked every day since last Sunday, the 14th. I have yet to get a day off since then, so crafting hasn't been happening much lately.
I was able to crank this out last night, though, and I think it turned out OK for being thrown together in literally 5 minutes! I used a printable set from Treasure Box Designs, and how cute is she?!?! I also got a stamp set from Scrappy Moms, and I LOVE how perfectly this picture went with the sentiment! So, I printed her on the MTC mat at 5.5"x4.5". Once I saw it, I knew it was too big for a card, so I had to get my brain working to figure out what I could do. I ran to Wal Mart and got a $1.00 cheap picture frame, and used only the easel back of it to make this. I covered the easel with a 5.5"x7.5" mat from American Crafts Merrymint pack from last year, then I used a 6.5"x8.5" piece of green, cut the square out of the middle, used an SU! lights wheel stamp, the Scrappy Mmoms stamp for the sentiment, and that was it!
I don't have a picture of it, but I also cut out extra layers of just the bear and made her dimensional. Maybe I will try to get a picture of that later to illustrate, but basically I printed out the entire image, then adjusted the settings in MTC so it would only print and cut out the bear parts. I then used pop dots to layer her face, arms, and feet! Have I mentioned how much I LOVE MTC?!?! Lol!
Ok, definitely going to try to get a picture of the dimensional aspects up, maybe with some screen shots of what I did in Make the Cut to achieve this?? Anyone think they may like to see that?? Thanks for visiting today!
I was able to crank this out last night, though, and I think it turned out OK for being thrown together in literally 5 minutes! I used a printable set from Treasure Box Designs, and how cute is she?!?! I also got a stamp set from Scrappy Moms, and I LOVE how perfectly this picture went with the sentiment! So, I printed her on the MTC mat at 5.5"x4.5". Once I saw it, I knew it was too big for a card, so I had to get my brain working to figure out what I could do. I ran to Wal Mart and got a $1.00 cheap picture frame, and used only the easel back of it to make this. I covered the easel with a 5.5"x7.5" mat from American Crafts Merrymint pack from last year, then I used a 6.5"x8.5" piece of green, cut the square out of the middle, used an SU! lights wheel stamp, the Scrappy Mmoms stamp for the sentiment, and that was it!
I don't have a picture of it, but I also cut out extra layers of just the bear and made her dimensional. Maybe I will try to get a picture of that later to illustrate, but basically I printed out the entire image, then adjusted the settings in MTC so it would only print and cut out the bear parts. I then used pop dots to layer her face, arms, and feet! Have I mentioned how much I LOVE MTC?!?! Lol!
Ok, definitely going to try to get a picture of the dimensional aspects up, maybe with some screen shots of what I did in Make the Cut to achieve this?? Anyone think they may like to see that?? Thanks for visiting today!
Labels:
Christmas craft,
MTC,
Print and cut,
Treasure Box Designs
Wednesday, November 17, 2010
Print and Cut with Make the Cut....WOOO HOOOOO!!!!
OK, so I have been really excited about this for over a week, but have been working until almost 10 every night and unable to play until now. I think you are all aware how much I LOVE my Make the Cut, and now, Andy, the developer, has added in a way to print and cut images. The ones below are from Treasure Box Designs, and I cannot be more excited about how they came out! I got the paper placement just the slightest bit off, but for a very first try, I think it came out pretty well!! I am going to need to buy printer ink every week, I'm so hooked!
The newest version of MTC also has a rhinestone template feature, for which I bought a new iRock tool. Hopefully, I get to play with that feature soon!! Thanks for visiting today - now I need to turn these cute cut outs into projects!!!
Tuesday, November 16, 2010
Glitter ornaments for the cause
This week, my school is hosting a Coaches vs Cancer basketball tournament in honor of my co-worker's mom, who passed away from ovarian cancer in 2008. People usually donate items to be sold to raise money, so this was my contribution. I used Stand and Salute for the awareness ribbon, and did the floor polish technique we all know and love for the glitter, lol! I thought lavender was the color for ovarian cancer, but just found out it is turquoise, so OOPS!!
I only made eight for now, since these were such an epic fail at the craft fair I did a few weeks ago. If they sell, I can always make more for later in the week, as the tournament runs all week and weekend! Thanks for visiting today!
Saturday, November 13, 2010
T-shirt painting
This was another project I did for the craft fair, that I had forgotten to photograph and post - oops! This was very simple, and I used Hello Kitty Greetings and Pooh Font for it. I love Pooh Font for these baby onesies, as it is so simple and cute. Anyway, I just did the blackout for the orange base, and then cut the layer, ironed on the second piece of freezer paper after the orange was dry, and painted in the black. Simple!! Thanks for visiting today!
Thursday, November 11, 2010
First time playing with.....
Chalkboard paint!!!! I first learned of this after seeing Carrie at Greenbean's Crafterole do her tutu chalkboards, and I had no clue prior to that there was such a thing as chalkboard paint. So I decided it was time to go to Lowe's and give it a shot. This was so easy, it's ridiculous! I cut the penguin at 10" tall from Animal Kingdom out of a cereal box, and painted it with the chalkboard paint. I then used the face layer to paint the white for the face and orange for the beak. I have written and erased several times, and I love it!
I chose the penguin because I made this to keep at my boyfriend's, and he loves penguins! Every time we see one on TV, he gets a big smile on his face, so this was a no brainer. Sorry about the quality of the picture, but I had to use my cell phone, so it is marginal at best, but you can get the idea. Anyway, this was a lot of fun, and I highly recommend playing with this paint and technique to everyone! Thanks for visiting today.
Wednesday, November 10, 2010
Third and final old Thanksgiving card
I think maybe this one is my favorite, but I don't know. What do you all think? The beard and mustache are from Paper Doll Dress Up, and they are supposed to be Santa's, but I made them black for his "disguise". More stickles on this one and (thank you for the comment in the first post) the turkey is from Animal Kingdom. I'm currently working on my first project in over a month, so hopefully I will be posting something brand new in the next couple of days! Thanks for visiting today.
Tuesday, November 9, 2010
Old Thanksgiving card #2
OK, here is the second one. I used a Cuttlebug folder on the mat, and I thought the googly eyes gave him the perfect expression for the sentiment. Stickles galore again on this one! Thanks for visiting today!
Monday, November 8, 2010
Old Thansgiving cards
For the next three days, I will be sharing three Thanksgiving cards I made last year. Again, this was in the first few weeks of my cardmaking, and it's funny to see how elementary my first few weeks were. Notice the overuse of stickles - yeah, I had just bought them and this was my first work with them! LOL. I don't even remember what cart the turkey is from, since this was long before my Gypsy or design studio days. I used my printer for the sentiments, and a few stickers here and there. I also used the Bazzill swiss dots papers on two of them. So, here is the first one, a Thanksgiving card circa 2009. Thanks for visiting today!
Friday, November 5, 2010
Attitude aplenty!! LOL
I want to thank Stacy, over at Love that Bug, for giving me this award! I was very surprised, and not sure I deserved an award due to my sporadic posting lately, but when I saw the title of the award, I was like, "Yeah, there's one I can accept!" LOL! Well, Stacy is jsut so sweet, and she always takes the time to comment on many of my posts, and I am always so appreciative of that. She does some amazing work over there, so please take a minute to check out her site - and her adorable monkeys!!
The rules for this award are simple and few - to list three things about me and my blog that make it unique, and to pass it along to five other bloggers.
OK, three things that make me and my blog unique:
1. I like to change up the background for every holiday and season. It probably drives some people crazy, but I'm goofy like that. Sooo...get ready for the Christmas look soon! Heehee.
2. I like to share tidbits from my personal life in addition to my crafts. For example, pictures of my new cat, the most recent post before this one.......sorry if that annoys anyone!
3. I bring my goofy personality and "tude" into every post write up I do! I really am this silly in real life!! : )
OK, so the five people I would like to pass this on to are:
1. Barb at Snowmanlover's Paperie
2. Carrie at Greenbean's Crafterole
3. Melissa at Melissa's Scrappen Place
4. Jin at Under a Cherry Tree
5. Marcia at Scrappin Times
Thanks again, Stacy, for thinking of me on this one!
The rules for this award are simple and few - to list three things about me and my blog that make it unique, and to pass it along to five other bloggers.
OK, three things that make me and my blog unique:
1. I like to change up the background for every holiday and season. It probably drives some people crazy, but I'm goofy like that. Sooo...get ready for the Christmas look soon! Heehee.
2. I like to share tidbits from my personal life in addition to my crafts. For example, pictures of my new cat, the most recent post before this one.......sorry if that annoys anyone!
3. I bring my goofy personality and "tude" into every post write up I do! I really am this silly in real life!! : )
OK, so the five people I would like to pass this on to are:
1. Barb at Snowmanlover's Paperie
2. Carrie at Greenbean's Crafterole
3. Melissa at Melissa's Scrappen Place
4. Jin at Under a Cherry Tree
5. Marcia at Scrappin Times
Thanks again, Stacy, for thinking of me on this one!
Tuesday, November 2, 2010
Looking for some good advice, please!!!!
Well, here's the deal. I have a lot of student loans, and some credit card debt, all from going back to grad school. I had no debt and a good amount in savings before I went to grad school, and now, well.... Today I received a bill for my final student loan going into repayment, and it is not good. Over the last few months, I have barely been able to meet my bills each month. Now, with this new bill every month, my bills officially exceed my income by about $300.00.
SO, does anyone have any great advice - loan consolidation is not being offered in the recession, so that's out! If anyone has been through it, I would LOVE to hear your suggestions. At this point, I basically need a miracle. Anyone have one of those lying around?? LOL. Ugh...
Sunday, October 31, 2010
Happy Halloween, everyone!
Here is a little pumpkin that my boyfriend and I drew faces on, lol. It was too small to carve, so I just got out the sharpie and away we went! Sorry the pictures are from the side, but the reflection from the flash was awful, unless I changed the angle of the lens. Oh well, you get the idea!
I hope everyone has fun trick or treating, if you are taking the kids, and take some time to watch part of one of the Halloween movies on AMC today! Have fun and be safe!
Friday, October 29, 2010
Do you see what I see??
I just thought this was so cute! I know you can't tell, but there is a lot of dimension within the box itself. The hills are each staggered and pop dotted at different depths, with some inking for extra emphasis. The sheep are from Paper Doll Dress Up, and the font is Plantin, I think. The background paper is from Joann's, the star is from Joys of the Season, and the hills are just hand torn.
When I saw this picture, i realized that they needed something done with their ears (lol), so I put a piece of black behind each cut out so you couldn't see the stars through them. Oops!! Anyway, I thought it was a cute, simple message for the upcoming holiday season! Thanks for visiting today.
Tuesday, October 26, 2010
Wild Card ornament card
I added a ribbon to this after I took the picture, sorry! Anyway, this is from the Wild Card cartridge, and I cut it as a 5"x5" card. The paper is from the Eskimo Kisses line by Basic Grey, and I love it! I also added some silver glitter at the top to give it a more authentic look, haha, and I did a stamp on the inside from SU! Sorry, didn't take a picture of that for some reason (?). I'm really slacking! The Noel title is from Winter Woodland, and I welded it in the Gypsy.
These were pretty easy, and I was able to make 90 of them rather quickly! Yep, that's 90. ANyone want to buy some ornament cards??? LOL! Thanks for visiting today.
Sunday, October 24, 2010
So excited and honored!
My niece just asked me today if I would make her wedding invitations!!! I am so honored, and hope I can come up with exactly what she wants!
With that said, if anyone has ANY helpful advice, PLEASE feel free to let me know! I have never made an invitation, so any help is appreciated. Also, what are some good sites to get the envelopes with some color coordinated liners??? I have a feeling that will be the hardest part, finding those!
Friday, October 22, 2010
Snowman card
A little while ago, I saw a card on the Stampin' Up! website with a snowman theme that used these colors (certainly celery and baja breeze), and I immediately went to Barb's site and ordered 2 packs of each! I just loved the combo of these two colors, so I cut the snowman from Doodlecharms, used a Peachy Keen stamp for the face, cut tags from A Child's Year, and off I went!
The sentiment on the tag is SU!, as is the wheel stamp across the baja breeze border piece. I ran the card through the Cuttlebug with the front of it inside the folder, and the back of it I kept plain. I felt the border piece needed just one more thing, so I went ahead and got my white jelly pen and made the dashed border on top and bottom. These were also for the card fair, so I kept them relatively simple in order to make multiples. Thanks for visiting today!
Thursday, October 21, 2010
Time for a flashback!!
This was one of the first four or five cards I ever made last year, so I decided it was time to post this one with Fall in full swing!
It's interesting to see your first couple of cards and how you did things, and think about how you've changed and grown. This seemed so pretty at the time, but looking at it now, it looks so simple! I still think it's pretty, but you can definitely tell it was one of my first attempts at cardmaking! From the heavy hand with the orange stickles, to the lack of embossing. I do have to say, at least I chalked the leaves to give them some dimension. Yay me! Also, the sentiment on the inside is something I found on the thread over at the Cricut MB with several pages of sentiments people had shared, so thank you everyone!!
So, if I remember correctly, all of the leaves are from Pooh and Friends, the acorns on the inside from Stretch your Imagination, and the Autumn title is from Wild Card. This was before my Gypsy, and even before my Design Studio purchase, so I have NO idea what sizes the leaves are. I basically remember hitting the size dial every cut to experiment. How far I've come since then!! LOL. Thanks for visiting today!
It's interesting to see your first couple of cards and how you did things, and think about how you've changed and grown. This seemed so pretty at the time, but looking at it now, it looks so simple! I still think it's pretty, but you can definitely tell it was one of my first attempts at cardmaking! From the heavy hand with the orange stickles, to the lack of embossing. I do have to say, at least I chalked the leaves to give them some dimension. Yay me! Also, the sentiment on the inside is something I found on the thread over at the Cricut MB with several pages of sentiments people had shared, so thank you everyone!!
So, if I remember correctly, all of the leaves are from Pooh and Friends, the acorns on the inside from Stretch your Imagination, and the Autumn title is from Wild Card. This was before my Gypsy, and even before my Design Studio purchase, so I have NO idea what sizes the leaves are. I basically remember hitting the size dial every cut to experiment. How far I've come since then!! LOL. Thanks for visiting today!
Wednesday, October 20, 2010
Simple "Joy to the World" cards
I used an entire pack of SU designer paper to make 24 of these 6x6 cards. These are just two of the designs, but they all worked well with this cute little word art SVG from SVGcuts.com! I used MTC to cut them, and it is a simple 2 piece pattern that was a breeze to reproduce quickly!
The inside sentiment is also Stampin' Up!, and the ribbons are from Michael's. Many of the cards I made for the craft fair are so simple and easy, that there isn't much to say about them! Thanks for visiting today.
Tuesday, October 19, 2010
"Thinking of you" cards
I think these are my favorites from the ones I made in the last few weeks. I especially like the yellow daisy one from the Sweet Stack. Same specs as most others - the mats are from DCWV Latte and Sweet stacks, stamp sentiment from Michael's, tags from ACY and Lacy Labels - and again, I kept them simple in order to make in many multiples. So, that's it for today, and thanks for visiting!
Sunday, October 17, 2010
Haunted house take 2!!
A couple of months back, I did a test run of the hautned house from Happy Hauntings, and I was pretty happy with the way it came out, but it was definitely a practice run. This time, I cut it all on the scale of a 12x12 mat, making the final product about 9" tall, so it's a much better size for decoration purposes. The one that I cut earlier was to the 12x24 scale, and it was just too cumbersome and bulky. This one is currently sitting on top of the speaker, which is on top of my boyfriend's entertainment center - he was SOOO happy about this...LOL!
For this one, I scaled all of the pieces in the Gypsy, and cut a couple of ghosts, trees, and spiderwebs from Happy Hauntings to go on it. I also used Core'dinations cardstock for the roof pieces, and sanded it to bring out the green. I then used a little bit of white ink on the railing pieces, just to give it a little bit of an old and weathered look. I also put a battery operated tea light inside of it, but obviously did not get a picture of it lit up right now. The windows are all vellum, so the light would show through nicely, and the trees are 4" and 5" tall. I may put something on/in the trees, but for right now, this is good enough. Thanks for visiting today!
Friday, October 15, 2010
Flower pot cards
I made 35 of these because they were so quick and easy! I used a file from My Scrap Chick, and cut them at an overall dimension of 6"x4". The scalloped edge is a pattern from DCWV Garden stack, and I felt like it went perfectly with a flower pot theme. I used the Swiss Dots folder on the flowers, and the Divine Swirls on the leaves for a little extra.
I left them blank inside because I feel like these can be used for any occasion, so I wanted to make them versatile. Thanks for visiting today!
Thursday, October 14, 2010
Baby cards
Today's post is a set of baby cards I made for the craft fair. I actually also made a green one for each set, but have no idea where that one went! Anyway, I used New Arrival for the onesie cuts, a really old stamp set for the lettering inside the blocks, and cardstock from Anna Griffin and DCWV.
I ran the onesies through the CB with Swiss dots, and on the inside, used an SU sentiment stamp for new baby. Thanks for visiting today!
Wednesday, October 13, 2010
Get well themed cards this time!
More on the same idea, just a different occasion. Same as before - overall card dimensions are 5x7, and the mats are from DCWV Latte and Sweet Stacks. Tags are from A Child's Year, and Lacy Labels. The sentiment is from a set at Michael's, as is the ribbon.
Sorry I didn;t say much, but I am feeling pretty crappy, so my energy and creativity are pretty low right now, lol. Thanks for visiting!
Tuesday, October 12, 2010
Congratulations cards
Same as the birthday cards in the last post, these were embellished with Lacy Labels and tags from ACY. In the blue and pink ones, I stamped an SU wedding sentiment, and on the darker striped one, I used a stamp that says, "Chase your dreams, you just may catch one." I thought it was nice and general for a congratulations card.
Also the same from yesterday are the mats with from the DCWV Sweet Stack and Latte stack. Thanks for visiting today!
Monday, October 11, 2010
One of the craft fair cards: birthday
I used two 4.5"x6.5" mat stacks - DCWV Sweet Treats and DCWV Latte stack - for the mats for these cards. It made them quick and easy, avoiding cutting a ton of rectangles! Lol. So, for the birthday cards, I used Lacy Labels for the sentiment frames, and for the Latte cards, I used A Child's Year for the tags. I kept the insides simple and quick with an SU stamp. The outside stamp is from a set at Michael's.
These are just three patterns of the five in the set. Basically what I did was take each mat stack, and pick several designs out of each to make cards around. I used 15 designs from the Sweet Stack, and 10 from the Latte stack, and tried to make some male themed, some female themed in each set. See how much thought I put into all of this?? Haha. I then grouped them by occasion, and divided them into sets of 5 cards. I will post the other occasions in the coming days. Thanks for visiting!
Saturday, October 9, 2010
Craft fair pictures
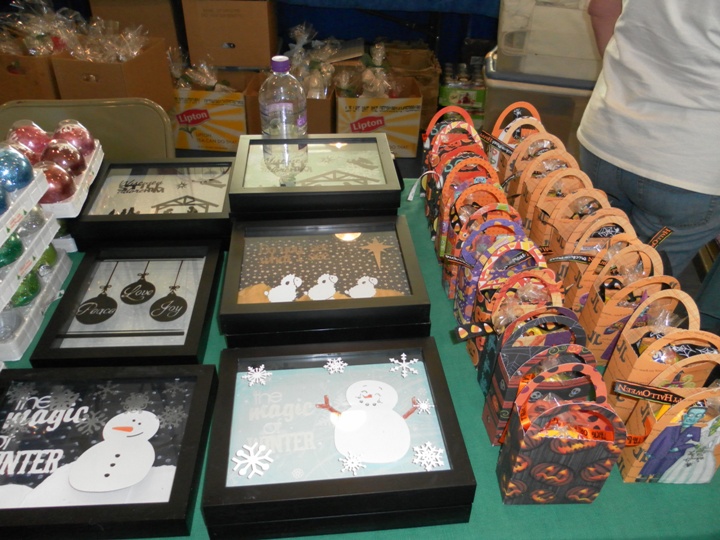
Well, it's over, thank goodness! I have been working tirelessly for a couple of months, to the point of neglecting my boyfriend, my poor cat, and the gym! So, here is what my table looked like at the beginning of the show:
I counted it up, and over the last 6 weeks, I made...wait for it......wait for it.....568 cards. No, that is not a misprint.....568 cards in a little over a month. So, that is what the table looked like before it opened. And I did not take a pic of it afterwards, because, well, it looked pretty much the same. : ( It was not a good day, and I am feeling pretty dejected right now. Soooo many people stopped to exclaim how beautiful my work was....but then they just walked on to the next table. I did sell over half of my Halloween treat bags, a few shadow boxes, and about 30 cards. But not ONE, not even ONE, ornament sold. I thought they turned out cute, but I guess not. That's what I get for thinking my work is OK.
So, I am taking a much needed break fromc rafting to gather myself and my pride. Thank you for visiting!!!
I counted it up, and over the last 6 weeks, I made...wait for it......wait for it.....568 cards. No, that is not a misprint.....568 cards in a little over a month. So, that is what the table looked like before it opened. And I did not take a pic of it afterwards, because, well, it looked pretty much the same. : ( It was not a good day, and I am feeling pretty dejected right now. Soooo many people stopped to exclaim how beautiful my work was....but then they just walked on to the next table. I did sell over half of my Halloween treat bags, a few shadow boxes, and about 30 cards. But not ONE, not even ONE, ornament sold. I thought they turned out cute, but I guess not. That's what I get for thinking my work is OK.
So, I am taking a much needed break fromc rafting to gather myself and my pride. Thank you for visiting!!!
Friday, October 8, 2010
Cupcake shape card
This is another simple and quick one that I threw together for the craft fair en masse. I used a file from My Scrap Chick for this, and I omitted the heart from the front, for simplicity. I used the Divine Swirls on the icing portion, and squeezed out some stickles for the sprinkles or jimmies, depending upon where you live in the country. We Jersey people get made fun of for calling them jimmies, but oh well.
Anyway, back to the card, lol. I cut it so the finished card is 6"x4.9", and just stamped the inside with an SU stamp that says, "Wishing you the happiest birthday yet". Also, because it's for a craft fair, I made it in a rainbow of colors, as seen in the second picture.
Well, tomorrow is the craft fair from 9-4, so wish me luck everyone!!! I will post pics of my table all set up tomorrow evening, and let you all know how it went. Thanks for visiting!
Anyway, back to the card, lol. I cut it so the finished card is 6"x4.9", and just stamped the inside with an SU stamp that says, "Wishing you the happiest birthday yet". Also, because it's for a craft fair, I made it in a rainbow of colors, as seen in the second picture.
Well, tomorrow is the craft fair from 9-4, so wish me luck everyone!!! I will post pics of my table all set up tomorrow evening, and let you all know how it went. Thanks for visiting!
Thursday, October 7, 2010
More Christmas cards....
Are you bored yet?? LOL! I saw a similar idea on the messageboard a while back, and changed it up a bit. These are some really simple ones I did using A Child's Year and an Anna Griffin stack from last year. I did 35 total, and the sentiment stickers are from Michael's.
The inside is done with an SU! stamp, and an EK Success edge punch. I made these 6x6 just to keep it simple and make it easier on myself by cutting the 12x12 paper in half. The silhouettes are cut at 3.5" tall each, just to leave room for the ribbon and tag. More to come...I'm almost done now. I have 2 more days to put on finishing touches, and then it's Saturday. Thanks for visiting today!
Tuesday, October 5, 2010
Still working, BUT........
....I HAD to take some time out from my craft fair making to hit up the newly added Stampin' Up! Clearance blitz. OH MY!!!!! Barb over at SnowmanLover sent me a heads up, and thank goodness!! I was looking the other day at Michael's, and could not believe how expensive the small, lesser quality ink pads are. SU has many of the old colors for $2.99 each, and all of the old retired cardstock packs are on there now too. So if the color renovation left your favorites out in the cold, GO HERE!!!! Seriously, I got a TON of stuff for dirt cheap. Have fun!
Sunday, October 3, 2010
World Card Making Day efforts
As many of you know, yesterday was World Cardmaking Day! So, I decided to take it to heart this year, since I was not even making cards yet at this time last year, and really put my all into the "holiday". Therefore, I wanted to share with you much of the reason I have been hit or miss with posting lately. I am still getting everything ready for the craft fair, which is now less than a week away - eek! So next Saturday will be the end of the crazy cardmaking, and I can get back to a nice, leisurely pace. Here are two pictures of all of the cards I worked on yesterday. As you can see, most of them are in various stages of completion - some still need ribbon, some I ran out of the border I cut, some need senitments - but here is everything I did yesterday. Of course, each card/set will get its own post eventually with pics and details, but I wanted to give you an overview for now. Hope you enjoy....and boy, am I tired. So, it's off to enjoy my three year anniversary with my boyfriend, which is today!!! He has been sick as a DOG all week, so what are the odds that he actually planned ahead and I am getting my present today??? LOL! Not good, I'm afraid. Thanks for visiting today!
Friday, October 1, 2010
Cuttlebug cards
These were simple and easy for craft fair items! I just embossed with the Cuttlebug tree folder, inked the embossed area, matted it, and did some stamping inside. Call me crazy, but for some reason, I REALLY like how the non-traditional colors - the blue and lavender - came out here. I think it really looks nice.
So, I did 50 total, and it breaks down like this: 15 green, 5 lavender, 10 blue, 10 silver, and 10 gold. I am going to add ribbons to all of my cards in the last day or so before the fair next Saturday. Thanks for visiting!
Subscribe to:
Posts (Atom)