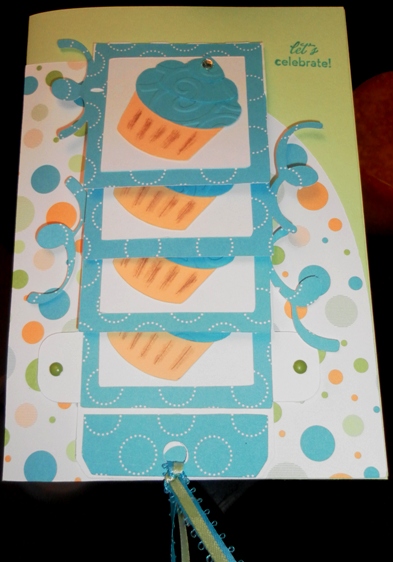
Well, it has been a stressful and trying couple of months, but I am finally getting back in the groove! Now that fall is here, hopefully all of us that took some time from crafting are refreshed and ready to go again! I know I am ready.
So, here is a waterfall card that is for my sister-in-law, from my Mom. I used SVG cuts waterfall card set, SU! patterned paper and cardstock, some Recollections gems from Michaels, and some stamps from the Fiskars birthday set at Michaels. The Daughter-in-Law stamp is from Scrapmaster's Paradise stamps, the mix and match family set. Hopefully this is the start of my rejuvenation, so welcome back everyone!!!
Thakns for visiting today!
A space to display my handmade cards and crafts!
Showing posts with label SVG Cuts. Show all posts
Thursday, September 22, 2011
Sunday, August 14, 2011
Lever birthday card
I just love this set from SVG Cuts!! This is for my 13 year old nephew's birthday, and he is into skating! I used the Breezy Backyard Lever Card set from SVG Cuts, Dude cartridge for the skater, and Batman cartridge for the Happy Birthday title. This card is the pinwheel card, in case anyone wanted to know the style. The star cardstock is DCWV All About Boys, the blue cardstock is from DCWV Guy Stack, and the inside striped is a loose sheet from Joann's. The stamp is SU!, and the star buttons are also from Joann's.
I think I have covered the details, so thanks for visiting today!
Wednesday, July 27, 2011
Christmas Lever Card
More Christmas in July! This is a lever card from the SVG Cuts set Holly Jolly Lever Cards, and this is my first attempt from this set. All papers are from the S.E.I. Christmas Mint collection, and the card base is a Recollections sheet. The tag with the sentiment is a cut from Lettering Delights Delilah Tags, and the stamp is SU. Oh, and just as an aside, if you have Make the Cut and have been out of the loop, you MUST go to the site and download the update. It is amazing, and has some awesome new features, including the one that imported these layers already in the proper colors!!!
OK, anyway, instead of using the flowers on the tree itself, I decided to put a couple up in the corners with some white gel pen and green gems to accent them a bit. Finally, the ribbon on the bottom is just a $0.99 roll from Michaels. I think that covers it all, so thanks for visiting today!
Thursday, June 23, 2011
Lever birthday card
This is a card from the SVG Cuts Breezy Backyard Lever Cards, and I was really intimidated by this set at first. They looked really difficult, but it was actually really easy to put together, thankfully. This particular card is a mixture of SU! and DCWV patterns, the inside stamps are from a Fiskars set from Joann's, and the "Wonderful Son" is an SP & Company set. Overall, the card came out to be a 5x5 square, perfect for my Mom to give my brother for his birthday this weekend.
Thanks for visiting today!
Labels:
Birthday card,
Lever card,
Masculine card,
MTC,
SVG Cuts
Sunday, May 22, 2011
Explosion box #3
I told you we have a lot of family birthdays in the spring! This one is for another niece, who hit the teen years last week! I used the SVG Cuts box template, cupcake, and bird for the inside, and the patterned papers on the inside are DCWV. The cardstock I used for the base is great, and I wish I had gotten more at Joann's during the sale a couple of weeks ago. The one exception is the pocket on the inside - that is an SU! pattern. The stamps are a combination of Scrapmaster's and Above Rubies Studios. OK, I think that covers it all, so thanks for visiting!
Sunday, May 1, 2011
Simple male birthday card
I decided I was running out of ideas for themes for all of my brothers birthdays, so I decided to try a patterned card instead. Then I saw the SVG Cuts Guy Cards, and thought, "Perfect!" For this, I used DCWV new Plaids and Stripes stack, which is amazing, BTW, SU! buttons, and my own TTF that I got free from fontriver.com. I put the words on the mat in MTC, changed their positions a little, welded, and lastly, created a shadow layer for it all. My trusty white gel pen finished off the wording with a little extra, and that was it! So easy, and I think it looks OK, right?? Thanks for visiting!
Friday, April 29, 2011
A Kreations by Kim original MTC file - scalloped gatefold card!!
My first one! I saw a similar card in Cards magazine, decided to challenge myself by trying to make a file from scratch in MTC, and I did it - here it is!! I know it wasn't rocket science or anything, but I was pretty excited. I took a 6x6 square, welded two scalloped circles to it, then put the small circles in the scalloped areas to create the cutouts. The butterfly is from SVG Cuts Edisto Island card set, and the papers are SU! I needed to add something to the butterfly, so I got out my trusty gel pen and some adhesive gems from Michael's. On the inside, all of the stamps are SU! except the "happy birthday' which I got at Michael's also.
Not to be conceited or presumptive, but if anyone is interested in the MTC file, I will more than happily share it with you via e-mail. Just leave me a comment with an e-mail to send it to, and I will gladly send it! Thanks for visiting!
Monday, April 18, 2011
Well, I got lazy.
I used the exact same file from my boyfriend's birthday card, and made one for my friend at work. They turned 30 within days of one another, and with all of the craziness going on for me right now, I just didn't have the energy to start from scratch. So, here is another waterfall card with some different SU! patterns, all from a pack that was recently on clearance. The butterfly cardstock is from a DCWV stack. The stamp on the top is also SU! and the one on the inside of the pull flap is from a set at Michael's.
Thanks for visiting today!
Tuesday, April 12, 2011
Waterfall birthday card
This was my card to my boyfriend last week. I did the flower waterfall card from SVG Cuts and picked some nice, springy colors and patterns to try to pick up his mood. All of the patterened papers are from Stampin' Up!, but I don't remember the name of the pack, sorry. I used the Curlz font from Windows to cut out the 3,0, and exclamation points, and the chipboard on the inside is from a DCWV Sweet Stack embellishment pack. The stamps on the inside of the pull strip are SU! also, and I hand wrote the inside later.
The second flap is a 0 under there - I just realized when I uploaded these that I didn't get a pic of the middle flap, but you get the idea, right? LOL. Thanks for visiting today!
Monday, March 7, 2011
Probably my favorite card yet!!
I LOVE the way this card turned out, but I can't take any credit for the design of it, lol!!! This is one of the waterfall cards from the SVG Cuts set, and I am SO glad that I went ahead and got this!! It took a while to put together all of the pieces, and the part that took the most time was picking out all of the different colors and patterns!! This is a birthday card for a good friend of mine, and I really can't wait to hear from her about how she likes it! I even included a video this time so you can see it in action, because it is awesome!!
OK, here are the specifics: all papers and stamps are Stampin' Up, which made it really easy to coordinate. I wish I could remember all of the colors and patterns I used, but unfortunately, I cannot. However, Barb over at Snowmanlover will probably be able to tell you, if you want to head on over and ask her! I also used the Divine Swirls on the icing cuts, added some pale green MS gems to the tops of the cupcakes, and the ribbons and brads are from Michael's. There were a lot of components and details to this card, but I think it is well worth it, don't you?? OK, and finally, here is the video showing the waterfall card in action. Thanks for visiting today!
Thursday, February 24, 2011
Puppy shaped card
How adorable is this little guy???? Oh my....SVG Cuts could NOT have made this easier to make. It's from the new Charm and Chance set, and I think this is going to be my niece's birthday card this spring. She loves her little dog, and I just thought of her as soon as I saw the cut. The card base was cut to fit to a 12x12 page, and the final product is 4x5. A little smaller than I usually like, but it's fine. The flower gem in the collar is from some random embellishment set that I can't even remember! LOL. You should really take a look at this kit - it has this card, a clover shaped card, a pot of gold treat box, and even more cute stuff!!
I left the inside plain for now, until I am 100% sure what this card is going to be used for, but I added some dimension to the front with a white gel pen and pop dots for the ears. It's so simple, there is nothing more to say, so thanks for visiting today! **DISCLAIMER** Just to let everyone know, I have NO affiliation with any graphic/svg site, company, etc. Just in case anyone was ever wondering, LOL.
Sunday, February 20, 2011
Christening Wobbler cards
My brother was asked to be a Godfather for two sisters today, and one of them is four, the other is 15 months. I didn't really have any carts or images appropriate for a baptism or christening, so I figured using cute angels would work. I can't believe that I typed all of this out at first, only to forget to write that I made them WOBBLER cards!! WOW....the wobbling action was really cute, since they are angels. Kitty actually looked like she was flying! One is from Hello Kitty font, and the other is an SVG Cuts bear from Candy Cherub Bears. The tags are from Once Upon a Princess, and I used Amy Chomas' gel pen holder and Staples gel pens for the sentiments on the tags, and on the inside of the HK card. The pen I wanted to use for the other card was really acting up, so I gave up and used an SU! stamp for the inside of the pink one. I used Divine Swirls for the pink bear, and the patterned papers are just loose sheets from Michaels. The cross stamp on the inside is also from Michaels dollar bin, which I love, PS.
The font for the inside of the HK card was French Script, and I used MTC to do it all! Well, I think that covers it all. I didn't realize until I wrote this post how much I had going on with these cards! Thanks for visiting today.
Labels:
Baptism card,
Hello Kitty,
MTC,
SVG Cuts,
Wobbler card
Friday, February 11, 2011
I'm back...with a Valentine's project!
Well, the whole tax issue isn't settled yet, but I decided to wait until April this year to figure out things and file, so in the meantime, it's time to craft again!
Wednesday, I was at my Mom's, and my nephew had a note that said the kids would be exchanging Valentines on Thursday, the next day, and he needed to make a box for receiving cards. WELL, I immediately told my sister-in-law that I could make him an actual mailbox if she wanted, so that's what I did! This is from an SVG Cuts set, and I didn't do the greatest job, but it was kind of a rush! I used K&Co paper, and cut the double heart from the file, then joined his name into it with MTC to create the cut out name tag. I cut the pieces at 11.4 in MTC and it came out a perfect size.
I just took a red marker and made some faux stitching on the hearts to give it a little detail, and that's about it. I also gave him some stickers to finish it off as he desired. No sense in me doing ALL of it for him, lol. If you are interested in the file, go here. I plan on working on some more V-day projects this weekend, so hopefully I will have plenty more to share this week! Thanks for visiting today, and for hanging in there with me!
Wednesday, I was at my Mom's, and my nephew had a note that said the kids would be exchanging Valentines on Thursday, the next day, and he needed to make a box for receiving cards. WELL, I immediately told my sister-in-law that I could make him an actual mailbox if she wanted, so that's what I did! This is from an SVG Cuts set, and I didn't do the greatest job, but it was kind of a rush! I used K&Co paper, and cut the double heart from the file, then joined his name into it with MTC to create the cut out name tag. I cut the pieces at 11.4 in MTC and it came out a perfect size.
I just took a red marker and made some faux stitching on the hearts to give it a little detail, and that's about it. I also gave him some stickers to finish it off as he desired. No sense in me doing ALL of it for him, lol. If you are interested in the file, go here. I plan on working on some more V-day projects this weekend, so hopefully I will have plenty more to share this week! Thanks for visiting today, and for hanging in there with me!
Wednesday, January 5, 2011
Valentine treat bag
No, your eyes are not deceiving you, this is the same file as the bunny bag. I decided to think outside the box SLIGHTLY and make it into a Valentine box.
I sized it to fit a 12x12 sheet of paper, which is a loose sheet I got last year at Michael's. I then replaced the bunny with a valentine teddy file someone uploaded to the MTC gallery, I replaced the egg flourish over the door with a heart flourish from last year's Mother's Day cart, and the window boxes were changed too. I used a welded heart file from the SVG cuts Valentine candy cherub set, and welded a rectangle to the bottom for the base, then pop dotted the white layer and the entire window box. A few dots with my gel pens set it off nicely, as did the stickles on the front heart flourish and door, along with the epoxy sticker. I feel like something is missing, but for now, this is OK, I guess. Thanks for visiting today!
Sunday, January 2, 2011
A really, really early test cut
I should be working on Valentine's stuff, but I recently got this from SVG Cuts, and had to test it. I sized it larger than it's supposed to be because I wanted to make sure there weren't any too tiny cuts at its intended size, but this was nice and easy. Making it smaller will also allow me to use more patterned paper and dress it up. I used some pastel 12x24 paper I got at OMC, and then used DCWV glitter paper and a pattern from the Sweet Stack to add some color. I also would pop dot the window boxes and the bunny, but I don't have any pop dots at my boyfriend's! LOL. Also, I think next time I will use Peachy Keen Critter faces for the bunny! Below are all four sides of the bag, turning the bag to the right each time.
So, overall this is 9"H x 5.5"W. I can't wait to do it for real and use pretty patterned paper and see how it all comes together. Guess these will be my Easter treat bags this year, so until I do these for real, I hope you like my little test cut, and thanks for visiting today!
Friday, December 17, 2010
Santa gift bag
Well, I can't believe that today is the last day of school!! We are officially on Christmas break as of 2:00 PM today, and it is going to be nice. Of course, I'm still going to have to be there for the sports, but at least it will just be a couple of hours each day. Hooray for break!
So, I put this together for my friend at work, and SVG Cuts has done it again! This is from a set called Big Christmas Bags, and they certainly weren't kidding. This Santa is 11.5" tall - what a great set for gifts! I made it out of some thicker cardstock to give it some strength, and then used regular cardstock for the details. The picture doesn't really show the details well, but here goes. For his hat, I used paper from DCWV that says Ho Ho Ho all over it - can you see it? Also, his beard, mustache, and pompom on the hat were all run through the Cuttlebug with Divine Swirls. I used 1/16" pop dots on the mustache, and 1/8" on the nose and eyebrows, which also is not visible here. Some more patterned paper on the sides from DCWV Tis the Season, and that finished it off. The second picture is the assembled gift all finished with tissue paper and a ribbon to top it off. It really looks much cuter in person, seeing all the dimension and details. Oh well - thanks for looking today!
Wednesday, December 15, 2010
Christmas star bag
Another from the SVG Cuts set, this is really easy too! They do a great job of putting these SVG's together to make them super simple to assemble. This is the star bag from that set, and I decided to leave off the "Joy" banner and make it out of a cardstock with words on it instead.
The tag was cut from Winter Frolic at 2.5"x1.6", and I added some small adhesive gems to the tree to give it a little bling. The paper was from DCWV Tis the Season pack, and I really liked the non-traditional color scheme. I believe my Mom is going to use this for giving a gift card, and it is the perfect size for it. A little tissue paper and it will be ready to go! Thanks for visiting today.
Saturday, December 11, 2010
Another Christmas gift box
This is another in the set from SVG cuts that also included the double gift bag below. I really, really like this set, and it is easy, despite the mistakes in folding you can easily see on this one, lol. It was definitely a test run, and I have some playing to do with the siazing of the scalloped layers, but all in all I think it turned out OK. I used DCWV patterned papers, with the one for the base of the box being from last year's "The Christmas Stack" and the scalloped layer patterns from this year's "Tis the Season". I used plain white and hit it with the CB Divine Swirls for one of the layers, and finished it off with some adhesive gems.
If you have MTC and want this set, go here, to find it. That's about all, so thanks for visiting today!
Thursday, December 9, 2010
My turn, finally! Lol
I have been dying to try these Christmas bags and boxes from SVG Cuts for a couple of weeks now, and finally had some time last night! This is one of only five adorable patterns, and I didn't really do it justice. I'm not entirely happy with my selection of patterns and embellishments, but I was so excited to just try it that I didn't put a whole lot of thought into the details, lol.
Anyway, this was all done on 12x12 paper and the overall bag is 9" high and 5" wide. The inside area of the bag that would hold a gift, etc, is 4.5" H x 3" W, so it's a good size. If a company ever makes 12x24 Christmas or holiday patterned paper, you could make this even larger, but oh well (hint, hint someone!!!).
SVG cuts broke this down into 2 pieces, and it was really easy to put together - I highly recommend this set for anyone with MTC or SCAL. The patterned papers are from DCWV new Christmas stacks this year and I got them from Michael's. The stickles are uneven, but again....rushing in my excitement to get it together, lol.
Hopefully I can get the rest of these done this weekend and show you more. So much I want to do, so little time! Thanks for visiting today!
Anyway, this was all done on 12x12 paper and the overall bag is 9" high and 5" wide. The inside area of the bag that would hold a gift, etc, is 4.5" H x 3" W, so it's a good size. If a company ever makes 12x24 Christmas or holiday patterned paper, you could make this even larger, but oh well (hint, hint someone!!!).
SVG cuts broke this down into 2 pieces, and it was really easy to put together - I highly recommend this set for anyone with MTC or SCAL. The patterned papers are from DCWV new Christmas stacks this year and I got them from Michael's. The stickles are uneven, but again....rushing in my excitement to get it together, lol.
Hopefully I can get the rest of these done this weekend and show you more. So much I want to do, so little time! Thanks for visiting today!
Subscribe to:
Posts (Atom)