

Friday, April 30, 2010
Happy Friday!
Wednesday, April 28, 2010
T-shirt overload and a couple of cards!

Here is the first of the two cards. This is for my niece who is entering her teen years, and is starting to get into the girly shoes, purses and shopping stuff! And she just got a brand new bedroom set, and she picked a pink and yellow comforter, so I wanted to use that color scheme for her card. The purse and shoes are both from Forever Young, and I cut the background with Just Because cards. Here are the details:


Purse - cut at 1.78" x 2.1"
Shoes - cut at 1.5" x 1.2"
Background piece - 3.4" x 5.3"
I also wanted to emboss the purse, so I used the CB flowers folder, and the gems are just adhesive gems from Michael's. On the inside, I cut another background piece of the same size and used Amy Chomas' mini gel pen holder to write the sentiment with a font in MTC! I think that about covers it all, so thanks for visiting!
And finally, this card is for my mom, and I threw it together in about 5 minutes today. Here is the story. In January, she had a hip replacement, but there were complications and she had to be in a wheelchair for 10 weeks, which she HATED. She is still young - 64 - and independent, so that alone was awful. Once she could start putting some weight on her leg, she pushed the envelope one night, and fell and broke her wrist. Yep, you guessed it, another surgery a couple of weeks ago! Then today, I took her to get the sutures out of her wrist and the Dr. noticed one of the incisions where he placed the pin is getting infected. THEN he looked at her foot and saw it was too swollen for comfort, so he sent us over to get her a Doppler of her leg. BLOOD CLOT!!! We are both about at the end of our collective ropes, so I felt really badly for her and wanted to make her this card.

 Not sure if you can tell, but the glass is actually cut out of acetate. The "sugar" on the rim is not my original idea, as I saw someone else do this on the Cricut MB last week or so. Also, this pattern is MUCH less obnoxious in person that in the picture. I liked the fact that the reverse side was lemons, so I had to use it. All cuts are from Just Because cards, and the paper is from a K&Co pack. Thanks for visiting!


Monday, April 26, 2010
Heat transfer vinyl technique
Here is my first attempt at heat transfer vinyl. The chick was cut at 3.1" x 2.6" and the cracked egg I just sized to fit over it. I put the eyes and beak on with some fabric paint, and the "just hatched" is also painted on. The chick is CAC and the wording is Pooh font, as in the previous onesies. I used Siser Easy weed heat tranfer, and I bought it online at:
www.hhsignsupply.com/productcart/pc/Heat-Transfer-Vinyl-Material-c335.htm
 I liked H&H because you can buy a multi-pack by the foot, instead of the large rolls, but if you do a search for Siser heat transfer vinyl, you can find it elsewhere. I also saw that Custom Crops carries the Silhouette heat vinyl, so just look around and find what you like! For this, I used the color "Cream" for the egg, and "Sun Yellow" for the chick. In order to set it, I used my iron on the highest cotton setting, put a thin cloth over the vinyl, and pressed my iron onto it for 60 seconds. IYou have to apply a fair amount of pressure, but it worked perfectly, and I really like the look of the vinyl! Hope you like this one, and thanks for visiting!
www.hhsignsupply.com/productcart/pc/Heat-Transfer-Vinyl-Material-c335.htm

Onesie video!!
Well, by your request, here is the video - sooo nervous!!! It is NOT good, lol, since it was only my first attempt ever at a video. The audio is a bit garbled because the microphone is not the best, and it's probably a little too long, but it is a learning process, and hopefully you get something out of it. By now you all probably have even figured out what I did, but this is a good practice run for me. So glad everyone liked the onesies, and I did a vinyl one tonight, so look in the post above too! Critiques are welcome and requested, since this is my first video, especially form those of you who have done these before - let me know what I can do to make it better! Thanks for visiting!
Here is the freezer paper stencil technique I used for this:
www.youtube.com/watch?v=FRyXlSTtHPA
Sunday, April 25, 2010
Happy 40th to my brother!
Friday was my brother's 40th birthday, so I made this for him. The boy fishing is from A Child's Year, and the "Happy Birthday" is from Beyond birthdays. The background paper is from DCWV Rustic stack, which I really like for masculine cards. The card was too simple with just the cuts, so I added three buttons just to give it something else, without adding ribbon! LOL.


On this inside, I wrote, "May you find the simple pleasures of youth on your birthday ---- especially now that you're OLD!!" Haha, I had to - all of my brothers are considerably older than me, since I was an "Oops" baby! Thanks for visiting, and I am currently working to figure out the video for the onesies. I am going to give it a test run tomorrow night, so stay tuned!
Friday, April 23, 2010
Critter onesie video??
For those not on the Cricut MB, I have had many requests over there for a video tutorial on these shirts, particularly how I did the different colors. Now, I have never done a video (let alone a tutorial!) so it may take me a few days, if I can get it done at all, and even then it may not be very good. I guess what I'm wondering is, would anyone be interested in this?
Also, I ordered some vinyl to do these shirts with instead of just paint (I have a specific idea in mind for one that almost requires vinyl vs paint), so I am thinking of doing two videos at the same time??? Just looking for some feedback from my wonderful followers! Love all of your thoughtful comments and encouragement!
Also, I ordered some vinyl to do these shirts with instead of just paint (I have a specific idea in mind for one that almost requires vinyl vs paint), so I am thinking of doing two videos at the same time??? Just looking for some feedback from my wonderful followers! Love all of your thoughtful comments and encouragement!
Thursday, April 22, 2010
I'm pretty excited about these - I hope you like them!
I have been working tirelessly on these over the last couple of days. Last week I got the idea to use the animals from Create A Critter with silly animal puns on baby clothes! So, I bought a bunch of onesies, some paints, fabric medium, freezer paper, and off I went. These are my first attempts, so I know I have a lot of practicing to do, but I think they came out cute! It took a lot of experimentation to get the right layers welded in DS and the right sizes, but the painting part was easy. The only one that isn't from CAC is the ladybug - no matter how hard I tried, the bug from that cart just didn't work out with this idea. So the ladybug on here is from doodlecharms. I also bought iron-on patches of flowers and butterflies that I will use to embellish on bigger shirts, but these are all newborn onesies.

 I followed the method laid out on the you tube videos on this technique, and also got the idea from theboydbunch on the MTC forum, so thanks for reminding me about this technique! She was making soccer shirts, so I immediately got this idea and went with it. Basically what I did was:
1. Put all of the three main layers of each critter on the DS mat.
2. I sized them, aligned them, and then hit "weld" for each layer. This actually helps you with weeding once it is cut.
3. Cut out the design on the freezer paper (not my idea, got it from you tube!) and use that technique.
4. For each color, I had to put the small pieces down that I wanted to be different colors, so there would be a void pattern after the main color was down. For example, the monkey's eyes, nose, and mouth all went down before I put on the light paint, and when that was dry, I colored in the empty spots with black.
5. When each color dried, I peeled up any freezer paper, and did the color I needed for those void spots.
It took a while, but I did all of the images in DS with CAC and Pooh font Set cart, which worked perfectly for this! Thanks for visiting, and as I improve my technique, I will post more! Also, I have close-ups of two at a time, if anyone wants to see them better, just let me know!
Tuesday, April 20, 2010
A new experiment
So, I have started venturing into the fabric crafting, using Cricut, MTC, and Design Studio. More to come, but since the Flyers are currently playing game 4 of their playoff series, I decided to go ahead and post this now for luck (?!?!). I used artist acrylics with a fabric medium from Michael's which was surprisingly easy! My problem is I am too impatient/eager to let it dry properly. Oh yeah, and my mom's cat knocked over the ironing board while it was still drying, so (of course) bright orange paint got on the mint green carpet! No kitty, that's a bad KITTY!


For this one, I cut the Flyers logo using MTC and the font was Century Gothic. I simply flipped the images and cut it on freezer paper, which I learned from the many tutorials on You Tube.
I have been doing A LOT of playing with this, and will have more to come soon. Please stay tuned, because I am really excited about the ideas flowing right now! Thanks for visiting and GO FLYERS!!!
Monday, April 19, 2010
Create A Critter
I literally threw this card together in 5 minutes for my niece's birthday, and this is the one she exclaimed about most when she opened it - go figure! BTW, she's 13.
 I cut the cat from CAC at 3", roughly, and the card base and inner circle are from Wild Card. It doesn't show up well, but I stamped the white background with SU's cupcake wheel stamp, and that's why the cupcake ribbon is on there (which is from Michael's). The flower and present are stickers from Michael's (told you it was a 5 minute card!), and the paper is from the DCWV Baby Girl Stack. Thanks for visiting today!

Saturday, April 17, 2010
More Bday cards....and another Animal Book!!
Almost done now! Tomorrow is the birthday party for my nephew Kyle, 16, and my niece Sammy, 13. The iPod cards in the previous post were also for them, but my brother is giving those to them. So here are a couple from my mom and I are giving them. After this, I have one left to do for Sammy, from my mom, for which I am using Create a Critter. Stay tuned!!
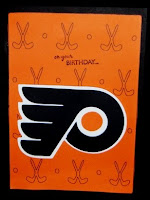
For these, I used MTC to create the Philadelphia Flyers logo and guitar card for Kyle. For the inside of the guitar card, I found a journaling tag that worked well for the inside writing! The paper is from Michael's, and the stickers are from the same pack as the journaling tag. On each, I stamped "On your birthday", which is an SU stamp, if you can see it!

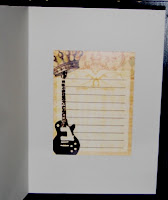
For my card to Sammy, I used a familiar pattern - animal books!! She loves her cat, and he happens to be a gray and black tabby, so I made it too look like her "Feather". Again, this is a file from My Scrap Chick, so head on over to her site if you like what you see!


Well, I guess that is all for tonight. I will post the Create a Critter card for Sammy tomorrow, after I finish it. Thanks for visiting today!
Wednesday, April 14, 2010
You Rock cards
These cards are for my niece and nephew, but they are being given to them by my brother (their Uncle) who asked me to make cards for him to give. The cards I am making for them will come later this week, lol.
 I used MTC and traced a JPEG of an iPod to cut these. I love my MTC, enabling me to cut anything I want! Anyway, the scalloped mats are DCWV stacks, and the recatngle itself was from a basic font built into MTC. The outside obviously says, "You rock", which was also cut with MTC and the Comic sans font, and the inside says, "...and I'm not just saying that because it's your bithday. Happy Birthday!" It is so hard to come up with sayings for cards, so I know how corny this is, but they are 13 and 16, so pretty much whatever I come up with would be corny to them! LOL. Thanks for vistiting!

Critter Invasion!!

Tuesday, April 13, 2010
First tri-shutter attempt
Tomorrow is my friend's birthday, and this is her card and gift. First, the gift. She and her boyfriend recently bought a house, so I wanted to do a "home" themed gift, because she is just so excited about it.

The cuts are from Home Accents, and they measure 15" L x 6" H, and the shadow box is from Michael's.
Next, the card. This was my first attempt at a tri-shutter, and I'm not sure if I like it. I used the tutorial on Split Coast Stampers (link to the right), and it was so super easy.

 The hard part was deciding on all the colors and elements! I used patterned paper from DCWV Sweet Stack, and the pink cardstock is stamped with the SU! "Swirls" wheel stamp. The tag on the middle section is from Storybook, and the stamp is also Stampin' Up. The cake is from Stretch Your Imagination, embellished with some glitter. Finally, the little embellies are just stickers from Michael's that I thought went well with this color scheme and theme. I think I've about convered it all, so thanks for visiting!

The cuts are from Home Accents, and they measure 15" L x 6" H, and the shadow box is from Michael's.
Next, the card. This was my first attempt at a tri-shutter, and I'm not sure if I like it. I used the tutorial on Split Coast Stampers (link to the right), and it was so super easy.


Monday, April 12, 2010
Good morning!
Well, I spent quite some time this morning going through and putting labels on all of my posts, so now it will be easier to find something you may have seen before and would like to see again! The label section is now the last item in the right sidebar, so you will find any old post now labeled and linked. I'm really wishing I had been doing it all along, but it's caught up now, and I will be doing labels form here on out.
I also put in Sweet Treat Cups and My Scrap Chick labels, for anyone interested in seeing particular products utilized on projects/cards. I would put MTC (Make the Cut) as a label, but most of my projects are made with MTC that you see here, so it would be a little redundant! Love this program, in case you couldn't tell! Have a wonderful day everyone, and I will be working on many birthday cards this week, so stay tuned! Thanks for visiting. GO PHILLIES!!!!!! : )
I also put in Sweet Treat Cups and My Scrap Chick labels, for anyone interested in seeing particular products utilized on projects/cards. I would put MTC (Make the Cut) as a label, but most of my projects are made with MTC that you see here, so it would be a little redundant! Love this program, in case you couldn't tell! Have a wonderful day everyone, and I will be working on many birthday cards this week, so stay tuned! Thanks for visiting. GO PHILLIES!!!!!! : )
Sunday, April 11, 2010
Final animal book - MOUSE!
So this is it, the last in the series. I want to thank everyone for all of your comments and taking the time to visit my blog this week! This little guy did not turn out as well as I had wanted, nor did the pictures, due to the fact that I again had to use my cell phone. I still can't believe I broke my camera, but I have a funny feeling my boyfriend will be getting me a new one for my birthday in a couple of weeks! Just a feeling, but I will keep you posted! : )

 Anyway, the mouse. That smudge on his face next to his whiskers is not an oops, it was something on my cell camera that I didn't notice until now. Oh well. For some reason, this little guy just looks off to me, but it's ok, he's still kind of cute. Again, you can get all of these files over at http://www.myscrapchick.com/, and this week I will be busy with several birthday cards, so stay tuned! Thanks for visiting, as always!


Saturday, April 10, 2010
Day 6 - LAMB!!
OK, well, I know I missed yesterday. Unfortunately, I broke my camera on Thursday night, and could not get a good enough picture with my cell phone yesterday, so I gave up. The lighting at work is pretty good, so I used my cell to take this picture today while I am sitting here bored. I'm still very unhappy that I broke my camera (I dropped it when a gust of wind took a bunch of items out of my hand, including the camera), but what's done is done.

 For the lamb, I decided there was a lot of white here, so I needed to give him a little extra. Because of that, I decided to use the Bazzill Basics Swiss dot paper that I got from HSN a while back. I think it's better than palin white cardstock, what about you? All extra pieces were again pop dotted, and the pieces were all inked in black for dimension. Thanks for visiting, and I will get the last animal book up later today to close out the week!


Thursday, April 8, 2010
An Award?!?!?!?!

The rules for this award are:
1. Give a top ten list of things that make you happy
2. Give a top five list of trivia about myself
3. Share the award with only 5 people and ask them to do the same
4. Link the blogs you choose and link the blog of the person who gave it to you
My ten things that make me happy:
1. My boyfriend, and spending time with him.
2. Hanging out with my mom a couple of days a week.
3. My nieces and nephews, especially the six year old - man, is he a character!!
4. Disney world!!
5. The beach, and just relaxing on it - especially if it's somewhere in the Caribbean. But I'll take any beach!
6. Getting in a nice shot on my boyfriend when we play tennis, and making him throw his racket! : )
7. Watching the Philadelphia Phillies, Philadelphia Flyers, and Denver Broncos.
8. Making cards that people enjoy and that are special to them.
9. Getting comments on my blog and/or Cricut MB posts!!!!!!!!!
10. A perfect spring day!
Top 5 trivia about me (don't judge!!! - lol):
1. I am afraid of spiders and snakes.
2. I can lift another person the same weight as me - for this reason I got the nickname animal at work.
3. I am the youngest of five, and the only girl!
4. My guilty pleasures are "Keeping Up With the Kardashians", "Big Brother", and the Gosselin family.
5. I graduated first in my class when I got my Master's, and I thought it was a good omen. HA!
The 5 people I am choosing to pass this award to are:
1. Barb - at http://www.snowmanlover.blogspot.com/
2. Greenbean - at http://thegreenbeanscrafterole.blogspot.com/
3. Melissa - at http://melissascrappenplace.blogspot.com/
4. Jin - at http://underacherrytree.blogspot.com/
5. Just2ducky - at http://just2ducky.blogspot.com/
Thank you again Stacy - I feel very honored!!!
Day 5 - PUPPY!!!
Animal book week continues with the puppy cut. I am acutally giving this to my niece for her birthday next month, because her dog is brown with beige spots and ears! So this little guy was custom made for her.


Thank you for visiting today!


Anyway, he is a bit smaller than the others, although I doubt you can tell! I cut him at 5" x 4.5", and inked, pop dotted....well, you knwo the drill by now. I apologize for the blurry backside picture, but for some reason my camera did not want to take a clear shot of it!
On a side note, I am very unhappy with what is going on with PC and the lawsuit against the software that allows me to create some of my projects. PC needs to realize that they do NOT have on offer everything and every image that consumers want, so we look for programs that allow up more options and freedom. MTC has not replaced my cartridge purchasing habits - on the contrary, I just bought 4 new carts last week with the cricutmachine.com BOGO offer. Since I bought MTC, I have gone through more mats and blades than I care to think about, because I am using my machine SOO much more frequently. Anyway, that's just my two cents and venting on that topic!
Wednesday, April 7, 2010
Day 4 - BEAR!!
Ok so I actually got this put together just now, since we are waiting to take my mom to the doctor. This is the bear, obviously, and he was inked, pop dotted, anddrawn on as with the others. Again, you can get all of these files at http://www.myscrapchick.com/ in the mini patterns section.
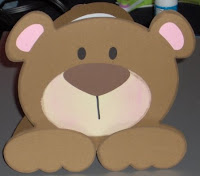

 If you look closely in the background of the open card picture, you can see my mom icing her splinted wrist!! At least she is in relatively good spirits about it all. The good news is her hip not only survivied the fall, but is actually doing better than expected, so it wasn't all bad!! Thank you all for your comments and prayers, and enjoy the bear! My boss told me to take the rest of the day off, so I should be able to do some cuts and finish my animal book series as planned! Thanks for visiting!


Loooooong day.....
Well, what a day. I left for work at 10:00 this morning, feeling severe anxiety for no reason at all. All day I was feeling anxious and nervous, and even my boss noticed immediately. Well, I left work at 7:30, only to get a call from my mom that she was headed to the hospital. For those who do not know, she recently had a complicated hip replacement that prevented her from putting any weight on her foot for 12 weeks, so she was in a wheelchair that whole time. Last week was week 12, so she was allowed to start getting out of the chair and using the walker. She got strong quickly and apparently got lulled into a false sense of security, because she fell tonight and broke her wrist in two places. So no going home after work for me, it was right off to the hospital - and the irony is, I work in orthopaedics! The x-ray techs let me come back in and look at the films, and sure enough, just as I diagnosed before she was seen in the ER, there was the radius fracture!
Anyway, five hours later, we arrived home with her back in the wheelchair, and with a cast on her right wrist. When it rains, it truly does POUR!!! I'm exhausted, and if any of you would like to offer up prayers, we will surely take them!! I can hear her in there now, moaning from the pain. This is awful.
So, what all of this means is I did not get to cut out the last couple of animal books, so we may need to put it on hold for a few days. I have been loving all of your comments, and am going to do my best over the next few days to do some cutting and posting! I hope you all have a better week than my mom and I!! Take care, and thanks for visiting!
Tuesday, April 6, 2010
Day 3 - KITTY!!


Monday, April 5, 2010
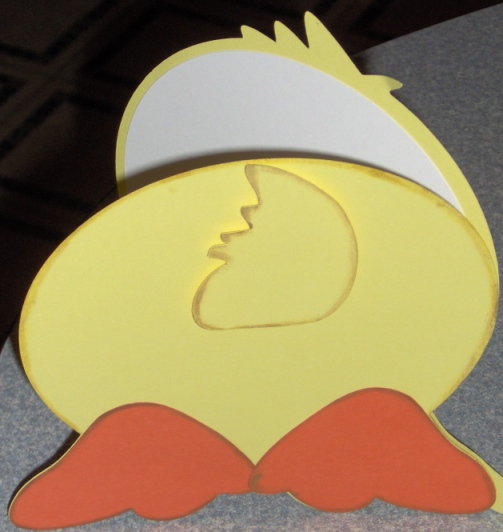
Animal Book Series day 2 - DUCK!


Sunday, April 4, 2010
Animal book week, day 1


This week, I will be featuring projects cut from files I bought at http://www.myscrapchick.com/ called "Animal Books". I decided to make cards out of them instead of books, and since there are seven, it works out well to have an "Animal Book Week" on my blog, so I hope you enjoy!
Since today is Easter, I decided that animal book week would start with the bunny! These patterns could not be simpler to cut and piece, so I highly recommend you check out this site if you have SCAL or MTC. The bunny was cut at 5" x 5.5", and all four paws and the tail were pop dotted for the 3-D effect, along with the edge inking for dimension. The face was easy to draw on with a black marker, and a little pink inking at the cheeks to make him extra cute was just the right last touch. Stay tuned for another animal card/book tomorrow!!! Thanks for visiting.
HAPPY EASTER!!!!
I just wanted to take a minute to wish everyone reading this, along with their friends and families, a wonderful, healthy, happy Easter Sunday! Thank you to all of my followers and those who have left comments - it really is a little thing that makes me so happy!
We are off to my boyfriend's sister's for dinner with his parents, and then later we are off to dessert at my mom's. It's amazing how four years later, I still miss my dad like crazy, especially on holidays! : ( But he is still at every family gathering, and always will be! Just remember to take time to appreciate your loved ones, celebrate and give thanks for the Resurrection, and have a Happy Easter everyone!
Kim V.
Saturday, April 3, 2010
Finally DONE!!
I have been busy all week completing all of these Easter cards and projects I've been posting, and these are the last several, including the post below. These are the two new original ones, inspired by the Cricut MB members, and the post below contains cards similar to ones I've already posted recently. For these, I followed the stair step instructions on Split Coast Stampers, and the egg card is a series of cuts from SVG Cuts website.
For the panoramic egg, I layered three of the "frame" eggs to create a shadow box effect, although it doesn't show up in the picture. The bunny and grass are from the Easter mini cart, and I used Divine swirls CB on the bunny, swiss dots on the background egg.

 For the stair step, the large focal egg is also from the Easter mini, cut with DCWV glitter paper. Bunnies, chicks, and eggs also all from the Easter mini, and the bunny on the last step is just a sticker from Michaels, from the same pack as the "Happy Easter" sticker in the front. Thank you for visiting!
For the panoramic egg, I layered three of the "frame" eggs to create a shadow box effect, although it doesn't show up in the picture. The bunny and grass are from the Easter mini cart, and I used Divine swirls CB on the bunny, swiss dots on the background egg.


....and the repeats!
Since these were all repeats of earlier cards and posts, I just bundled them all into one picture, just to prove how busy I really have been! These are all for various family members, and I am now going outside to enjoy this beautiful weather here! Thanks for visiting, and have a wonderful Easter!
Thursday, April 1, 2010
Easter treats

Subscribe to:
Posts (Atom)