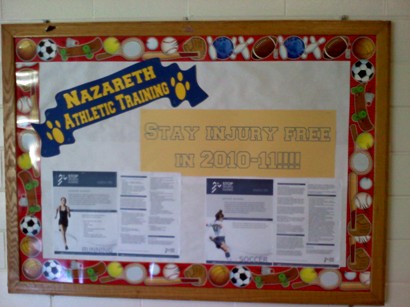
I did my first bulletin board at work with MTC! I used the banner from 09 Kut Ups, the Freshman font from DaFont.com, and Amy Chomas' sharpie holder with a blue sharpie.
I had a migraine while I was both designing and putting this together, so I wasn't able to think too creatively, unfortunately. The paws are there because our school mascot is the panda. Anyway, it was so quick and simple, that's about it, so thanks for visiting today!
A space to display my handmade cards and crafts!
Monday, August 30, 2010
Saturday, August 28, 2010
Halloween Treat bag
I'm getting into full swing with Halloween and Christmas ideas, so it's likely you will see a lot of it over the next few months - my apologies to those who do not like these holidays. However, they are my two favorite holidays, and I love to decorate and make cards for both! This is a simple bag pattern from My Scrap Chick, and you can find it under the mini patterns as the treat bag trio. This is the first one I did, so it was more of a test than anything. I actually plan to pop dot the decorations, but here are the specs.
I cut it to a full 12x12 mat, which made it about 5" high. I used some cute double sided cardstock from Joann's, and it was a pattern included in the recent 5/$1 sale. WOO HOO!!! I plan on making a bunch for nieces, nephews, and students this year! The added embellishments are from a huge K&Co assortment pack, and I should have used pop dots, but since this was a test run, I didn't. I plan on filling with candy in a treat bag, and then tying the handles together with a cute Halloween ribbon. This was so simple, there really isn't anything else to say, so thanks for visiting today!
Friday, August 27, 2010
3D Christmas house
This is actually the house from Handyman, slightly altered. I took the scallop border from PS and welded it to the roof pieces, to give it a more dressed up look. I also used a wreath sticker on the door from a Charlie Brown Christmas pack I bought at Michael's, and used a little snow glitter on the roof. The paper I used is from an SEI pack from last year called Winter Song.
Next one I make will, I will use double sided paper, I think. I plan on getting some battery operated tea lights, and putting them in there and selling them at the craft fair at my school next month. This was pretty easy to make, so it should be no problem making a bunch! Thanks for visiting today!
Thursday, August 26, 2010
Preliminary Christmas card???
OK, so I made this as a test run for a Christmas card idea I was kicking around. I work at a Catholic School, and thought these would be nice to give to co-workers (mostly nuns), since they are quick and easy to make en masse! What does everyone think? The designer paper and stamps are all from SU, and the ribbon I got at Michael's yesterday to finish it off.
I messed up some of the stamping, simply because I applied too much pressure in places, and I also do not have the correct color ink for this. The ink pad buying will have to wait until I get paid again on Sept 15th (OUCH!), but you can get the idea from what I did in the test run. I think I like these - what about all of you???
Tuesday, August 24, 2010
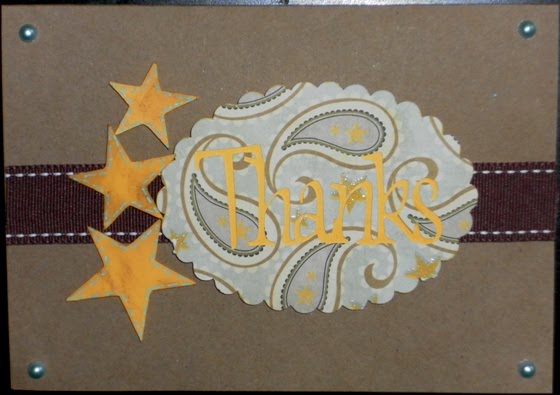
Thank you card
Well, I made this card for the car salesman that helped my boyfriend buy his souped up new Ford Edge, and it was a bit of a challenge. How do you make a thank you card for a male?? So, I used Kraft paper for the base, a tag made form a piece from DCWV Rustic Stack, and some stars. My boyfriend doesn't like the stars, so....what do you think?
The ribbon is from SU, the sentiment is from Beyond Birthdays, the tag is from ACY (monogram with hidden contour again!), and I inked and made faux stitching on the stars, cut from Plantin Schoolbook. A few pearls from a Recollections pack, and some inking on the inside mat, and it was done. It was very simple, but what to do about the stars? I feel like it needs some element, but he doesn't like it. I need opinions, everyone! HELP!! LOL. Thanks for visiting today!!
Monday, August 23, 2010
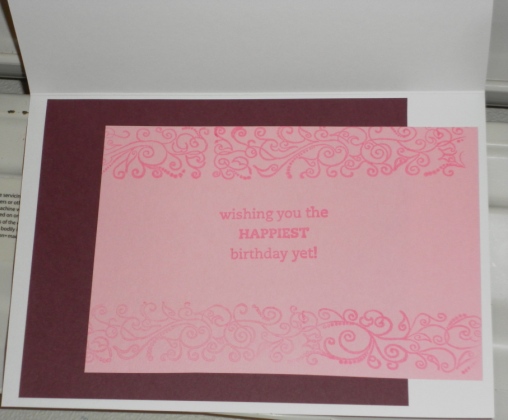
Flower birthday card
I decided to go with a classic look for this card. I just used some paper flowers I had gotten from HSN a few years back, and made the scallop tag with the "Happy Birthday" in it. The title is from Gypsy Wanderings, and the tag is from A Child's Year monogram function, with the letter contour hidden in the center. Then I just put the Happy birthday inside it, and used the negative cut with the dark layer underneath. Pretty clever, huh?? Lol.
So then I layered the flowers and put a half pearl int he center, put the ribbon under the tag, and on the inside, I offset the amts for a little visual interest. Hope it doesn;t look too weird. As always, the stamps are SU, and the card base is from DCWV Rustic Stack. A few stickles to the right side of the tag on the front and it was done. I hope the front doesn't need something more. What do you think???
Saturday, August 21, 2010
Precious Moments Birthday card
This is for my sister-in-law who, like me, collects Precious Moments figurines. So, way back in December when I first got MTC, I already knew what her birthday card was going to be! I thought this little angel holding a balloon was too cute! She is from a coloring page that was simple enough for me to make into an actual cut file, and I cut her at 6"x2.4". I then made a mat from a TTF called 09 Kut Ups from Clever Someday, and the base is a piece of double sided cardstock from a K & Co pack called Scrap on the Go.
I also hit the mat with the Divine Swirls folder, put a little cupcake on the inside (as well as a couple of gems in each corner of the inside mat) and both sentiments are SU stamps. I hope you like this one! Thanks for visiting!
Friday, August 20, 2010
Embossed birthday card
I'm baaaa-aaacckkkk!! LOL. I decided that I have not been using the embossing kit I bought from Amy Chomas enough, so I wanted to make a card with it after she posted one a week or so ago. Hers was much better than mine, but here is my attempt. I think I could have done multi cut three times, instead of the two, but it turned out relatively sharp. I used Create a Critter for the "Happy Birthday" and Gypsy Wanderings for the cupcakes. I then used a square frame from a random cart, and got them all grouped in the Gypsy, flipped the entire group, and put the foil color side down on the mat.
The background mat is from DCWV Sweet Stack, and the ribbon is random from Michael's. All of the stamps inside are from SU, and I decided to add some pink stickles under the ribbon and photo corners for the front mat. I'm hoping to get back to regular paoting, now that the long week of sports tryouts are over! Thanks for visiting today, and thanks for hanging in there with me while I was MIA and not posting!
Monday, August 16, 2010
Still here!
I know posting has been spotty the last couple of weeks, but I have been trying to take advantage of the last few gasps of summer, and now my summer is officially over today. : ( Back to work in a few minutes, and I will be monitoring all of the sports from 8 AM - 7 PM for the next week or so. After that, I am determined to start posting regularly again!!! I hope I do not lose any of my wonderful followers, you are all so sweet! Bear with me here a few more dasy, and then I kick it into gear with Fall, Halloween, and even Christmas projects. Have a great day everyone!
Wednesday, August 11, 2010
Anniversary card
I made this for my boyfriend's parents' 30th, and the idea came to me in a brainstorm, after he told me that she displays my cards on her dresser. This is actually the 3D frame from happy Hauntings, believe it or not. I used my Gypsy, and put two frame bases on the mat. I then flipped one and welded them together to make it into a card base. I then hit the shift key for the cutout frame, so I avoided the cobweb look, being that it's an anniversary card! The final cut from there was the stand for the frame. For that, I layered a piece of thin cardboard between two cuts of color to give it some strength.
Then I moved on to Stretch Your Imagination for the bride and groom silhouette, using shadow and shadow blackout cuts. Happy Anniversary came from Beyond Birthdays, and I also did a layering, blackout with that. The frame print mat is from DCWV Garden Party, and the base is from the SU Rich Regals. I have no idea if this color is retired or not, but it looks more maroon in the pic than what it actually is - it's more brownish in reality. The stamp on the inside is from SU also, and the ribbon is from Michael's. I added some half pearls to the front, and a 30 at the bottom, which I don't think you can see in the pics.
I think that about covers it all. Thanks for visiting!
Then I moved on to Stretch Your Imagination for the bride and groom silhouette, using shadow and shadow blackout cuts. Happy Anniversary came from Beyond Birthdays, and I also did a layering, blackout with that. The frame print mat is from DCWV Garden Party, and the base is from the SU Rich Regals. I have no idea if this color is retired or not, but it looks more maroon in the pic than what it actually is - it's more brownish in reality. The stamp on the inside is from SU also, and the ribbon is from Michael's. I added some half pearls to the front, and a 30 at the bottom, which I don't think you can see in the pics.
I think that about covers it all. Thanks for visiting!
Monday, August 9, 2010
I kinda like this...
So, a little background here. My 12 year old is currently obsessed with the old TV show "Family Matters", and Steve Urkel is his absolute favorite. He often goes around the house hiking his pants up to his chest, saying, "Did I do thaaaaat?" Also, his parents got him the first season as a birthday gift. SO, I had to make this for my mom to give him as a birthday card. Can you tell good old Steve is dropping the cupcake?? I hope it comes through in the translation well enough.
All of the doll cuts were from Everyday Paper Dolls except the suspenders, which I hand cut. Steve is pop dotted and cut at 4", and I used PKS for his face. The cupcake is a Recollections sticker from Michael's, and the font and talking bubble are cut with MTC, using the Family Guy font I found online. The mat is from DCWV Glitter stack, the inside stickers are just some non-dimensionals from Michael's, and I think that about covers it. I'm pretty proud of how this one came together, and I hope everyone gets a little chuckle out of this. Adam told me secretly that this was his favorite card this year! So cute. Thanks for visiting!!
Saturday, August 7, 2010
Now I'm torn...haha
I made this last night, and now I don't know if I want to give my 7 year old nephew the Batman or this card!! Input, please??!!!!!!
So, obviously I used Spongebob for this, and I decided to try one because he had a SB shirt on yesterday, and we got into a discussion about how he likes Patrick the best. So, here is what I did. All cuts are from SB, and I used the positive cuts from the inside mat on the outside and inside left. The cupcake is a sticker from an MS pack, "hooray" is cut with Mickey font, and the paper is a loose sheet from Joann's. Patrick was cut at 4" high, and the end product is a 6"x6" square card, with a 5.5"x5.5" inside mat. I think that's all for the details, so the party is in a few hours - which one should I give him?!?!?! LOL!!!
Friday, August 6, 2010
I'm Batman...........
Lol. Here is the card for the little one (my youngest nephew), and he is turning 7 next week! I was debating over Batman or Spongebob for his card, and I may still make a SB card tonight, just to decide. I used the Batman cart for all of this, and the background mat is also from the Making Memories Just Chillin' stack, which I love for boys and male cards.
Batman was cut at 4"x3", and the layers were pretty tough, if I am honest. I gave up on the white for the eyes and teeth, and just colored it in with a gel pen. Ugh...The star buttons are random ones from Joann's, and on the inside mat, I used Amy Chomas' gel pen holder to draw the cut on each corner. Pretty simple, so that's about it, and thanks for visiting!
Thursday, August 5, 2010
FInally posting again!
Sorry it has been so long, but I have been away a lot lately, and it is definitely time to start catching up on cards!
Here is one I made for my nephew's birthday this weekend, and he just turned 12. He just started really getting into skateboarding a few months ago, so I scoured the internet for skating images to use in MTC, because I was not really into buying the Lite cart for one or two images! I found this as a clip art in a Google search, and it was perfect! I figured a silhouette would be good for this, and the mat is a piece from the Making Memories "Just Chillin" stack. The title is from a free TTF and clip art also, and I just used the shaodw layer in MTC to create the effect - easy!
Finally, I used the SU Sanded background stamp to give it a sort of grunge look on the inside mat, added a couple of SU buttons on the front, then wrote in it, and it was done! Thanks for visiting today!
Here is one I made for my nephew's birthday this weekend, and he just turned 12. He just started really getting into skateboarding a few months ago, so I scoured the internet for skating images to use in MTC, because I was not really into buying the Lite cart for one or two images! I found this as a clip art in a Google search, and it was perfect! I figured a silhouette would be good for this, and the mat is a piece from the Making Memories "Just Chillin" stack. The title is from a free TTF and clip art also, and I just used the shaodw layer in MTC to create the effect - easy!
Finally, I used the SU Sanded background stamp to give it a sort of grunge look on the inside mat, added a couple of SU buttons on the front, then wrote in it, and it was done! Thanks for visiting today!
Sunday, August 1, 2010
So silly....
After some thought the other day, I decided to do some shopping at Wal-Mart, and this is what I found. How adorable is this house?? It's a dog house, but I wanted to get it for my kitty. She immediately went into it and ate and drank, and then laid in her little pink bed and relaxed for a bit. I know, I know....I'm weird. She loved exploring it, and she even almost jumped onto the roof of that little house! Just thought I would share while I was away for the weekend!! : )
Friday, July 30, 2010
I DID IT!!!! HOORAYYYYY!!!
I finally finished this puppy. Wow....I am embarrassed to admit how long it actually took me, so let's just say it took a while to do. I used my Gypsy and started with the very first cut in the handbook, making it as large as possible on the 12x24 virtual mat. I then made all of the layers scaled to that first one, by selecting it, going to the overlay and selecting the next layer, going back to the mat and ungrouping, then copying to the next layer, and so on. Is that too confusing?? If enough people would like to see it, I can make a video of how I did it on the Gypsy.
So, then I used Tim Holtz to dab silver ranger ink to break up the black. I did it mainly on the roof and fence pieces, to make it look a bit distressed. I followed the instructions directly from the handbook, so it was actually pretty easy. Designing the layers and cutting it all took a while too. Phew, but it's done!! I'm pretty happy with it, and it definitely can be made smaller. This turned out quite large, measuring 18"H x 12"W x 12"D. These pictures are from all four sides of the house. And with that, I am off to Washington, DC, for a nice long weekend! My boyfriend is 29 and has never been there, so we are headed down tonight! Hope everyone has a wonderful weekend, and I promise - no more Halloween stuff for a while. LOL!
Wednesday, July 28, 2010
OK, so, it's possible I'm obssessed!!
I just love these things!!! All cuts are from Happy Hauntings again! I did a couple more test runs, and here they are. They are both cut to fill the 12x12 mat, and then I layered the one on the left. The right one was my first attempts, so I kept it really basic to get the feel for size, cutting, etc. But I decided the throw a little ghost, some silver accents, and a skull and crossbone MS punch on it.
The one on the left was double sided paper from K&Co, fit to page, and then I got fancy. I took saran wrap, crinkled it, and dipped it into my blank ink to get the distressed look on the silver paper. I then used black glitter glue to accent the tombstone at the top, black pen around the perimeter, and I used the "MT Tomb" phrase from layer 1 of the tombstone on page 63 of the handbook for the glitter writing. I just used the negative cut as a stencil for the glue and glitter application. So much fun! I thnik that about covers it, so thanks for visiting!
My new baby
So, I finally got around to taking pictures of Tigger, my new cat, since she wandered up to our deck a little over a month ago. She is actually more people friendly than your usual stray. Well, I found out why. I posted these pics on Facebook, and a friend of mine responded that she is a Bengal cat, and there is a woman who breeds them 3 houses down. Uh ohhhhh.....so, I asked the dreaded question - do I need to give her back?? She said, no, if she is out, the woman let her out on purpose, maybe because she was the runt, went unsold, etc.
She also informed me that, since Bengal cats are partially bred from a bloodline of a wild cat from Asia, she will most likely not be fond of being petted, or ever be a lap cat. Apparently a friend of hers bought one from this woman near me, and she paid $1200. Yep, you read that right, $1200. WOW!!!
So, basically, when people buy Bengal cats, it's mostly for aesthetics, as opposed to affection. But that's OK. Every time I go out to see her, she meows really loudly, and is quite vocal and "talkative". So, I guess in her way, that is being friendly. If our suspicions are right, and she is pregnant, I will post more pictures! Note, though, how she has spots more than stripes! Beautiful!
She also informed me that, since Bengal cats are partially bred from a bloodline of a wild cat from Asia, she will most likely not be fond of being petted, or ever be a lap cat. Apparently a friend of hers bought one from this woman near me, and she paid $1200. Yep, you read that right, $1200. WOW!!!
So, basically, when people buy Bengal cats, it's mostly for aesthetics, as opposed to affection. But that's OK. Every time I go out to see her, she meows really loudly, and is quite vocal and "talkative". So, I guess in her way, that is being friendly. If our suspicions are right, and she is pregnant, I will post more pictures! Note, though, how she has spots more than stripes! Beautiful!
Tuesday, July 27, 2010
Back to creating!!
After a long week on the beach, I am back to creating, and was this fun and really easy!! This is from my brand new Happy Hauntings cart, and this was just a test run. I cut the 3D pumpkin box, and I cut it twice - once in orange, once in black. I then cut the face parts in black, inked the stem green, chalked for the brown lines, and it was done. These are very easy to put together, and I can't wait to do more!
For the size, I simply filled the 12x12 virtual mat on the Gypsy, so I could get it as large as possible. The end product is 5" x 3.2", and the fillable area is approximately 2.5" x 2.5", so I would say candy corns or something small would be best for this. I cut the base in black, then took just the pumpkin area from the orange cut and glued it to the black base, then glued on the face parts, also cut in black. I really can't tell you how easy this is, so I am on to other things....with the coup de gras being the 3D house. Wish me luck!!! And thanks for visiting today - it feels good to be back. Hopefully, I didn't lose too many followers from being idle for so long!!
Sunday, July 25, 2010
WOO HOOO!!!!!
Well, I left Ocean City, NJ, at 9:00 AM yesterday, and would you like to know the first thing I did???? I stopped at ACM to get these babies!!!! HAHA! I was waiting all week to stop and get these on my way home. Oh, and I also needed a dress for my class reunion last night, but the first stop was ACMoore. I verified with the clerk that these (not even supposed to be released yet) carts were included in the $39.99 sale, and they were! I was pretty excited, since I don't often buy carts, and I hope some of you got to take advantage of this deal last week!!! I will be back to creating this week, so have a great day everyone! I am winding down and enjoying my tan from vacation!!
Saturday, July 24, 2010
More Christmas in July!
OK, so here is another one. This was my very first Christmas card ever, and it took me a while to get it done, lol!!! Mickey and Friends and Celebrations were the carts used here, with a little glitter for the snow.
Wednesday, July 21, 2010
On vacation, soooo.....
How about some Christmas in July??? I will be gone until the 25th, so I figured maybe scheduling a couple of posts for a Christmas in July theme may be a little fun! I am going to do some cards I made for this past Christmas, and here is the first one. I made this for my niece who loves Pooh, and I used Pooh and Friends. This was my first Christmas making cards, so these are pretty simple!! Thanks for visiting!
Saturday, July 17, 2010
WHEW - Lots of work here!!!!
Wow, did these things take a while!! I think it was because I had so many to make!! OK, let's just get started.
I did a bit of tweaking since I posted my first one a week or so ago by deciding to paper the backs of the pages as well. I did NOT have the time or patience to layer both sides, so this will have to do! I made two different designs for the boys and girls, with the boys' book on top in the picture, girls' on the bottom. I made three of the boys and two girls books, so that's why it took so long. All cuts are from Life is a Beach except the shell on the girls books, which is from Disney Dreams Come True. See the pearls inside it??? I couldn't resist, lol. I used Divine Swirls on the shells and crabs, and Swiss Dots on the iguanas and flowers. Some inking for shading, coloring on the sandcastle and pineapple drink, and stickles and gems on the treasure chests completed it all!! I intentionally kept it plain and clutter free to give them the opportunity to decide how they want to use them, for pictures or journaling. Once they decide, I will make some mats and frames that fit their choice.
I'm leaving for vacation in a couple of hours, so the kids will get them later when everyone gets there. I hope they like them! Sorry this is so long, and I will be live again after I get back from vacation on the 25th! Have a great week everyone!!!
I did a bit of tweaking since I posted my first one a week or so ago by deciding to paper the backs of the pages as well. I did NOT have the time or patience to layer both sides, so this will have to do! I made two different designs for the boys and girls, with the boys' book on top in the picture, girls' on the bottom. I made three of the boys and two girls books, so that's why it took so long. All cuts are from Life is a Beach except the shell on the girls books, which is from Disney Dreams Come True. See the pearls inside it??? I couldn't resist, lol. I used Divine Swirls on the shells and crabs, and Swiss Dots on the iguanas and flowers. Some inking for shading, coloring on the sandcastle and pineapple drink, and stickles and gems on the treasure chests completed it all!! I intentionally kept it plain and clutter free to give them the opportunity to decide how they want to use them, for pictures or journaling. Once they decide, I will make some mats and frames that fit their choice.
I'm leaving for vacation in a couple of hours, so the kids will get them later when everyone gets there. I hope they like them! Sorry this is so long, and I will be live again after I get back from vacation on the 25th! Have a great week everyone!!!
Friday, July 16, 2010
Day 6 - elephant!
Look how cute!!! I drew on the eyes because they were cut a bit too large, so I took a sharpie and drew them instead! I inked the edge of the tail just to give it some distinction from the back end! Thanks for checking in today!
Subscribe to:
Posts (Atom)