I made this for my sister-in-law, and I think it turned out so cute! I was so excited about the inside that I totally forgot about taking a pciture of the front, lol. This is a cut from Lettering Delights' All Seasons Pop Up cards, and it was super easy! The cardstock is from DCWV Nana's Kids stack, and I sized the card to be 5x7. I cut a small piece of black cardstock and glued it behind the face to make it pop more, and that was about all! The sentiments are stamps from Stampin' Up, and the card base is from the Butterfly Wings Recollections pack. Thanks for visiting today!
A space to display my handmade cards and crafts!
Wednesday, October 26, 2011
Wednesday, October 19, 2011
Vinyl on tile
I made this for part of my niece's wedding gift (the other part was cold, hard cash, lol), and it actually coordinated perfectly with the placecard table! I used MTC to cut the vinyl, and it was just a file from the gallery that I layered with a second square in the middle to create the cutout in the middle to put in the "P". This was so simple and easy, but it really looked nice sitting on the table with all of the placecards, which had a tan table skirt and black top! My boyfriend was even impressed, lol - amazing! Thanks for visiting today!
Saturday, October 15, 2011
Happy wedding day to my niece!
Well, today is the day, and it is beautiful weather here! The wedding invitations I made all of those months ago, and here we are on the big day! I am sure it will be a beautiful wedding, and I will try to post some pics later. For now, here is one of the cards I made for today, and this one is from my brother to her. I used a patterned paper from Joann's, the card base is Tempting Turquoise from SU, the silhouette is from Stretch Your Imagination, and the stamps are from Clear Dollar stamps, which you can get here. The stickers in the corners are just some random ones from Michaels.
Thanks for visiting today, and have a great day everyone!
Wednesday, September 28, 2011
Trying the craft fair again
Well, for those who followed my blog last year, you may or may not remember that I did a craft fair at my work, and it was a total bust. Despite that, I am being a good solider and trying it again! This time, I have my Imagine on hand and plan on using it to the fullest. So here are a few onesies I did with Nursery Tails and some printable heat transfer material from Wal-Mart. I got a pack for light fabrics, and one for dark fabrics, and I am glad I did. The one for dark fabrics has a white background, whereas the light fabric material is a transparent background. So when I first did the green and dark pink ones, the lamb was pink (not cute), and the turtle completely blended in with the fabric. You can see how much better they are now, after using the material for dark fabrics! All images were cut at "2.7 relative". I think these turned out pretty cute. What do you think?? Thanks for visiting today!
Friday, September 23, 2011
Happy Bird-day - Imagine card
TGIF!!!! Ugh, what a nasty rainy day here. This fall has been awful with all of the rain - we would GLADLY share with our friends in Texas, who actually need the rain. Anyway, at least the weekend is here!
This is another birthday card for my sister-in-law, but this one was from me. I used Imagine More Cards and Yummy (inside sentiment tags), SU! Big Top Birthday patterned paper, and Tempting Turquoise cardstock for the base. The Imagine makes cards so quickly and easily, it feels like cheating!! Lol. Anyway, not much else to say, it was so easy! Have a wonderful day and/or weekend everyone, and thanks for visiting!
Thursday, September 22, 2011
It feels good to be back!
Well, it has been a stressful and trying couple of months, but I am finally getting back in the groove! Now that fall is here, hopefully all of us that took some time from crafting are refreshed and ready to go again! I know I am ready.
So, here is a waterfall card that is for my sister-in-law, from my Mom. I used SVG cuts waterfall card set, SU! patterned paper and cardstock, some Recollections gems from Michaels, and some stamps from the Fiskars birthday set at Michaels. The Daughter-in-Law stamp is from Scrapmaster's Paradise stamps, the mix and match family set. Hopefully this is the start of my rejuvenation, so welcome back everyone!!!
Thakns for visiting today!
So, here is a waterfall card that is for my sister-in-law, from my Mom. I used SVG cuts waterfall card set, SU! patterned paper and cardstock, some Recollections gems from Michaels, and some stamps from the Fiskars birthday set at Michaels. The Daughter-in-Law stamp is from Scrapmaster's Paradise stamps, the mix and match family set. Hopefully this is the start of my rejuvenation, so welcome back everyone!!!
Thakns for visiting today!
Tuesday, August 16, 2011
Space themed birthday explosion box
This was also for the eight year old, and the ONLY thing he wanted for his birthday was a telescope, so I knew I had to make this space themed. He wants to study the stars, as he told us, and I used a cute cardstock from DCWV All About Boys for the base of the box. The strips on top are scraps from the robot easle card in the last post, and the pieces on the inside are a loose sheet from Joann's. The telescope and rocket ship are from Lettering Delights Outer Space simple shapes, and the star buttons are from Joann's. To make the telescope 3-D, I cut three of them, and then took scissors to create small tabs to connect them together at the top. Making it stand was not esay, but I took glue dots, rolled them up, and stuck the leg of the telescopes into the glue ball, then stuck it to the box. There was a lot of improvising here, and I still do not know how I pulled this one off!! LOL.
Anyway, thanks for visiting today!
Monday, August 15, 2011
Robot easel birthday card
Since we had the birthday party for my nephews on Saturday, get ready for a few of their cards, lol. The first was yesterday, and here is the second. This one was for the eight year old, and he picked out the paper at Michael's, not knowing it was for his card! So at least I knew he would like it! The robot is from Lettering Delights Funky Robots clip art set, and the stamp is SU! This one was really simple and easy, so thanks for visiting today!
Labels:
Birthday card,
Kid's birthday,
Lettering Delights,
MTC
Sunday, August 14, 2011
Lever birthday card
I just love this set from SVG Cuts!! This is for my 13 year old nephew's birthday, and he is into skating! I used the Breezy Backyard Lever Card set from SVG Cuts, Dude cartridge for the skater, and Batman cartridge for the Happy Birthday title. This card is the pinwheel card, in case anyone wanted to know the style. The star cardstock is DCWV All About Boys, the blue cardstock is from DCWV Guy Stack, and the inside striped is a loose sheet from Joann's. The stamp is SU!, and the star buttons are also from Joann's.
I think I have covered the details, so thanks for visiting today!
Wednesday, August 3, 2011
Birthday card - Imagine
My brother asked me to make a card for his Goddaughter, whose age he is not sure of, LOL!!! Oh, brothers...Anyway, I think my niece said the girl is 7 or 8, so I am hoping this is age appropriate! I used Best Friends for the girl and balloons background, and Yummy for the cake, presents, and sentiment. I also pop dotted the gifts, although it isn't really noticeable here. The inside has a mat with a light background patter from yummy, an SU! stamp, and some ribbon from Michaels. I love how easy and quick Imagine cards are - I finished this off in about 10 minutes, at the most. Sorry about the pictures coming out crappy also. I have no idea why that happened. Thanks for visiting today!
Wednesday, July 27, 2011
Christmas Lever Card
More Christmas in July! This is a lever card from the SVG Cuts set Holly Jolly Lever Cards, and this is my first attempt from this set. All papers are from the S.E.I. Christmas Mint collection, and the card base is a Recollections sheet. The tag with the sentiment is a cut from Lettering Delights Delilah Tags, and the stamp is SU. Oh, and just as an aside, if you have Make the Cut and have been out of the loop, you MUST go to the site and download the update. It is amazing, and has some awesome new features, including the one that imported these layers already in the proper colors!!!
OK, anyway, instead of using the flowers on the tree itself, I decided to put a couple up in the corners with some white gel pen and green gems to accent them a bit. Finally, the ribbon on the bottom is just a $0.99 roll from Michaels. I think that covers it all, so thanks for visiting today!
Monday, July 25, 2011
Christmas in July week!
I figured I would make a few things to "celebrate" Christmas in July, so here is the first. I used the glitter technique known from many sources, and used Snow Angel with printable vinyl to print out three items for the front. The flat front ornaments from Michaels are the best choice for these. The glitter is all from MS iridescent super fine multi pack. They just need some ribbons, and they are ready to go up on the tree. These were a super simple, cute way to kick off the week, I thought! Thanks for visiting today.
Thursday, July 21, 2011
Wedding invitations - finished!!!
I finally finished my niece's wedding invitations and presented them to her Tuesday night, and she LOVED them, thank goodness!! Lol. This post is going to be pic heavy, so I hope it doesn't load too slowly, sorry! OK, here are the details. I used SU! Chocolate Chip and Tempting Turqoise cardstocks and inks, SU! Sweet Swirls wheel stamp, Recollections white cardstock and vellum, and ribbon from Michaels. The reception cards and invites are printed, and the response card is a stamp I found on eBay, with the SU! Chocolate Chip ink. The invites are 7.5" by 5.5" overall, the reception cards are 4x3, and the response cards are 2x3. Finally, the embossing is a Cuttlebug borders set. I think this covers all of the specs, so without further delay, here are all of the pictures. Thanks for visiting today!
And the inside:
Cloe-up of the reception and response cards:
And finally, all 100 of them that I made!
The entire suite laid out:
Close-up of the invite:And the inside:
Cloe-up of the reception and response cards:
And finally, all 100 of them that I made!
Wednesday, July 20, 2011
Bridal shower card
Hi again everyone! The last couple of weeks have been hectic, but Mom's bathroom is done, and my niece's wedding invitations are done also! That was the other big project I was working on, and now that I am finished all of it, I can finally get a beach day in today!! Woo hoo- first one of the summer!
Anyway, here is the card I made for her shower this past Saturday. I decided to make a gate fold, and I used Chocolate Chip cardstock, Bride designer series special paper, and a stamp from SU. I also used a small piece of DCWV glitter paper for the dress with some pop dots, just to give it dimension, and the patterned mat is DCWV also. The sticker is from Sticko and the cuts are from Wrap it Up and Wild Card (phrase only). I used gems in the color scheme of her wedding and a few pearls on the dress bodice, and she loved the card! For some reason, the pic came out a blurry, sorry. I will be posting the invites tomorrow, so thanks for visiting today!
Thursday, July 7, 2011
On a brief hiatus...
...while I remodel my Mom's master bath! My brother did the shower stall and tile, and I pretty much did everything else - drywall taping and spackling, sanding, painting. Tomorrow I finish the painting, and hopefully by next Tuesday I finsih off the border and we can get the fixtures in. I will post some pics when I am totally done, but crafting is on the back burner for now, lol. Thanks for visiting, and I plan on squeezing some time in tonight to watch the season premiere of Big Brother. Anyone else, besides Stacy and me??
Monday, July 4, 2011
Happy fourth!!
Good morning everyone! I just wanted to take a moment to catch up and say Happy 4th! First, I hope everyone has an enjoyable, safe holiday today and that you get a chance to relax and spend time with those you love! My boyfriend and I will be hanging out in the heart of where it all started, good old Philadelphia (see picture below).
Anyway, I have not been creating much lately because I have become OBSSESSED with this Casey Anthony trial. At this moment, actually, I am watching the prosecution's rebuttal. This is absolutely riveting stuff for me, and I would love to know if anyone else out there has been watching the proceedings at all.
I will leave you today with a bit of trivia regarding the picture below. I recently went ot Independence Hall in downtown Philly for the first time. You read that right - the place where our coutry first started, just 10 blocks from where I lived for 4 years, I had never been to until last week. Yeah, I am ashamed of that, lol. Anyway, this picture is of Thomas Jefferson handing George Washington his proposed declaration. Trivia factoid 1: Did you know that this actually happened on July 2nd, not the 4th?? Second factoid: This scene is on the back of the $2 bill. Yeah, I learned stuff when I went. LOL.

Anyway, I truly wish all of you a wonderful holiday, and pray for justice for beautiful little Caylee Anthony. I just hope today isn't the day Casey gets her freedom!!
Wednesday, June 29, 2011
Laptop decoration with the Imagine
I wanted so badly to use that printable vinyl, so here is what I did. Of course, there is a story behind it. Last week, while here for family Sunday dinner, my cat jumped onto my lap, but her claws are literally as sharp as hypodermic needles. So, I put a pillow on my lap for her to lay on and knead in order to save my legs, now that it is shorts weather. She eventaully curled up and went to sleep on the pillow, and my sister-in-law looked back and said, "She looks like a little princess on that pillow!" So.....out of my head popped this. All cuts are from the Best Friends cart, and I changed some colors and layered it in order to customize it for me. So, what do you think?? LOL!!! Thanks for visiting today!
Sunday, June 26, 2011
Imagine card
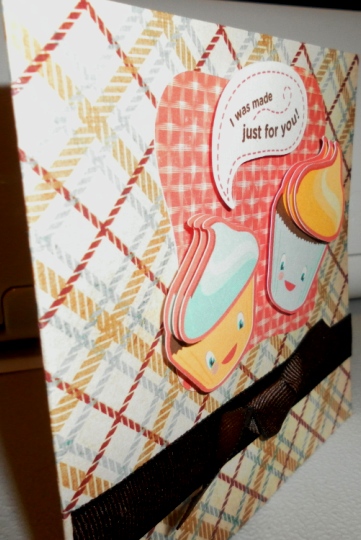
Good morning, everyone. Here is another Imagine card I made to play around a bit, and I loved this cut on Kate's Kitchen. I made it for my boyfriend, obviously, and I printed the frosting twice to get the extra layers and dimension, as well as using pop dots on the cupcakes and title piece - hopefully the side view will show that well enough. The card base is DCWV Guy Stack, and I changed the backgroud pattern slightly. The only thing I would like changed about the I is the flood fill. I wish I could change colors of certain layers individually, without having it flood fill and lose detail. But, oh well, I still love it, and plan to play with it a lot more in the coming weeks before I go back to work. Thanks for visiting today!
Thursday, June 23, 2011
Lever birthday card
This is a card from the SVG Cuts Breezy Backyard Lever Cards, and I was really intimidated by this set at first. They looked really difficult, but it was actually really easy to put together, thankfully. This particular card is a mixture of SU! and DCWV patterns, the inside stamps are from a Fiskars set from Joann's, and the "Wonderful Son" is an SP & Company set. Overall, the card came out to be a 5x5 square, perfect for my Mom to give my brother for his birthday this weekend.
Thanks for visiting today!
Labels:
Birthday card,
Lever card,
Masculine card,
MTC,
SVG Cuts
Tuesday, June 21, 2011
Test cards
These are the first couple of cards I made with the Imagine last night. They are both from Imagine More Cards, and I switched up the patterns a bit to practice with it. The birthday card is for my brother, and the congratulations card is for a friend of mine who just graduated from nursing school. The card base for the birthday card is from DCWV Guy Stack and the mat on the other is from the new Recollections 12x12 patterned paper packs at Michael's. I know these are really basic and not much to look at, but I hope to get lots more time to play this week. Thanks for visiting!
Oh. My. Goodness.....
I LOVE my new Imagine. I am still slightly holding my breath in fear of it being defective, but I did the most recent updates, and so far I love it! I was off taking my nieces on a tour of historic Philadelphia today, but I am going to finish up a second card tonight and post it. It took me exactly 10 minutes to get up and running and make a card last night. I was really excited, but my camera needed charging, so I will take a pic in a little bit and post it. For now, I am loving this machine, and I ahve barely even scratched the surface of what I can do.
On another note, as requested by Barb (aka Snowmanlover), I have added the gadget to subscribe by e-mail feeds. So if you prefer, it is located right under the followers. Stay tuned for some Imagine work.
Saturday, June 18, 2011
The Imagine is in the house!!!!
Unfortunately, I am not, LOL! I am at my boyfriend's for the weekend, and the I arrived at my MOm's today, so there was no waiting by the door for Fed Ex. Boo...but that's ok. From all I've heard, I need to mentally prepare for these updates anyway - I have heard baaad things about update attempts. Oh well. After three days of trying to get the Gypsy updated, I realized I will not be able to use it with my I right now - it just got too frustrating with not going through properly. Anyone else have that problem??
But I digress....I actually have a project today, can you believe it?? This is a graduation card for one of my students, whose party I went to last night. I used CAC for the panda, since that is our school mascot, ACY for the cap, and Wrap it Up for the tag. DCWV supplied the patterned paper, I used a few stickers for the title and embellishments, and the stamps are from a pack I got at Michael's.
Thanks for visiting today, and wish me luck trying to update the Imagine and Gypsy!!! Ugh....haha.
But I digress....I actually have a project today, can you believe it?? This is a graduation card for one of my students, whose party I went to last night. I used CAC for the panda, since that is our school mascot, ACY for the cap, and Wrap it Up for the tag. DCWV supplied the patterned paper, I used a few stickers for the title and embellishments, and the stamps are from a pack I got at Michael's.
Thanks for visiting today, and wish me luck trying to update the Imagine and Gypsy!!! Ugh....haha.
Thursday, June 16, 2011
A return, and a fun announcement
Wow....I cannot believe I have been off for almost a month! I'm sure no one really noticed, but I have missed all of my blog friends! I have been busy with finishing up end of the year stuff at school, working fundraisers for our department, and putting together our entire sports banquet. Also, this week was the 6th anniversary of my Dad's death, and with Sunday being Father's Day, I usually fall into a funk this time of year. Throw in the mix a biospy for my Mom (which came back clear, thank God!), and it has been a crazy few weeks. I actually have made a few cards lately, but am too dissatisfied with them to even post.
However, I have a fun announcement. After getting a little extra birthday money last month, and stalking eBay for a couple of weeks, I am getting my very own Imagine. YEP!! You read that right. I am cautiously excited, though, because I have seen many mixed reviews on these suckers, so I am taking a wait and see approach. Also, it seems that a lot of the PC bloggers have not used them much lately, so I don't know if that is a bad sign or not. I would love to hear from any of you (if anyone is still even following me, lol) that have the Imagine, and all of your thoughts on it, good or bad. I am hoping that this sparks my creativity and gets me going in the right direction again! Thanks for visiting!
Sunday, May 22, 2011
Explosion box #3
I told you we have a lot of family birthdays in the spring! This one is for another niece, who hit the teen years last week! I used the SVG Cuts box template, cupcake, and bird for the inside, and the patterned papers on the inside are DCWV. The cardstock I used for the base is great, and I wish I had gotten more at Joann's during the sale a couple of weeks ago. The one exception is the pocket on the inside - that is an SU! pattern. The stamps are a combination of Scrapmaster's and Above Rubies Studios. OK, I think that covers it all, so thanks for visiting!
Saturday, May 21, 2011
Wow, it's been forever!
I can't believe it has been so long since I posted - oops!! I have been making a ton of cards (7 in the last 2 days), but I just haven't been on the computer much lately. Anyway, here is another card I made a la the just a note cart that I will never own (lol). It is a birthday card for my brother to give to my niece, and I wasn't sure the colors and patterns went together, but I guess it turned out OK. The phrase on the front is from Lettering Delights sweet cupcake graphics set, the cupcake on the middle piece is from SVG Cuts Cupcake cards and Tags, and the balloons and flowers are stickers from Recollections. Both patterend papers were loose sheets from Joann's, and the "My Heavenly Daughter" stamps is from Scrapmaster's line of clear stamps. I love this set!!!
I made this card in MTC, and used the shadow feature and welded to create the card base. Thanks for visiting today!
Subscribe to:
Posts (Atom)